One More Problem Solved In My Family Room – How To Build A Farmhouse Sofa Table
If you love this gorgeous rustic farmhouse sofa table then take a look at my step by step tutorial to build your own!
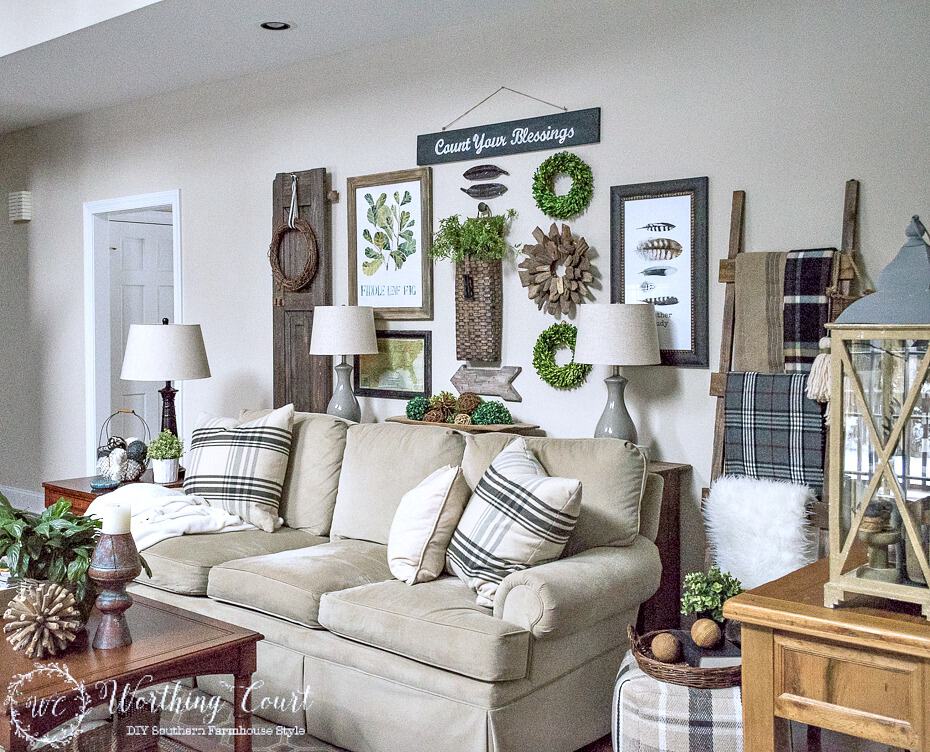
When I was pulling my family room together, I had a couple of decorating issues to solve – both of them on the sofa side of the room. Problem #1, was creating a gallery wall above the sofa that wasn’t too skimpy. For last week’s Best Of Worthing Court, I showed you how I took care of that problem with my farmhouse blanket ladder tutorial. Several of you have told me that you used my plans to build a rustic farmhouse ladder of your own. I love, love, love hearing that!
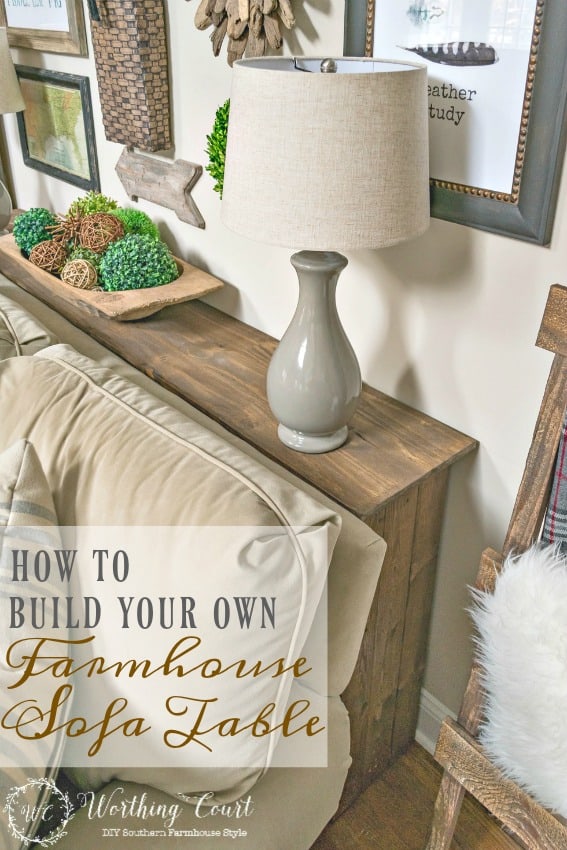
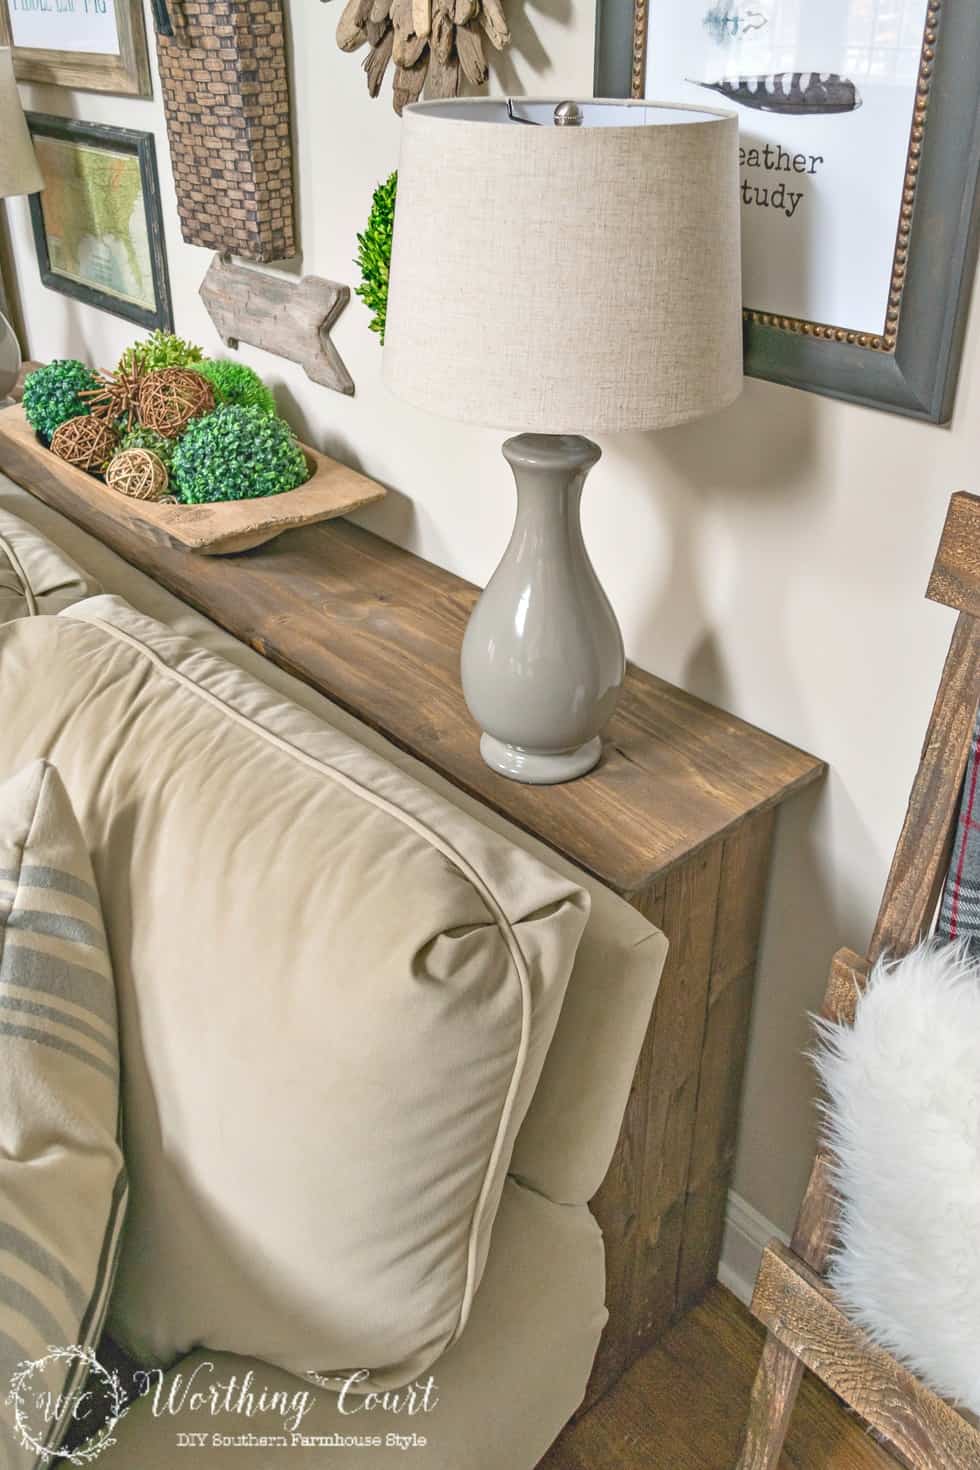
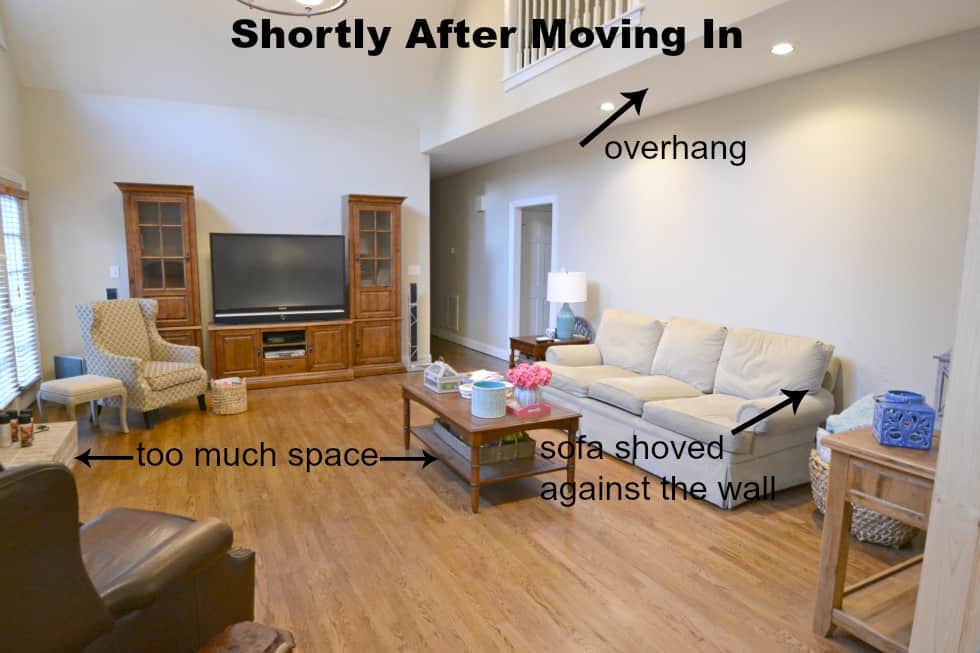
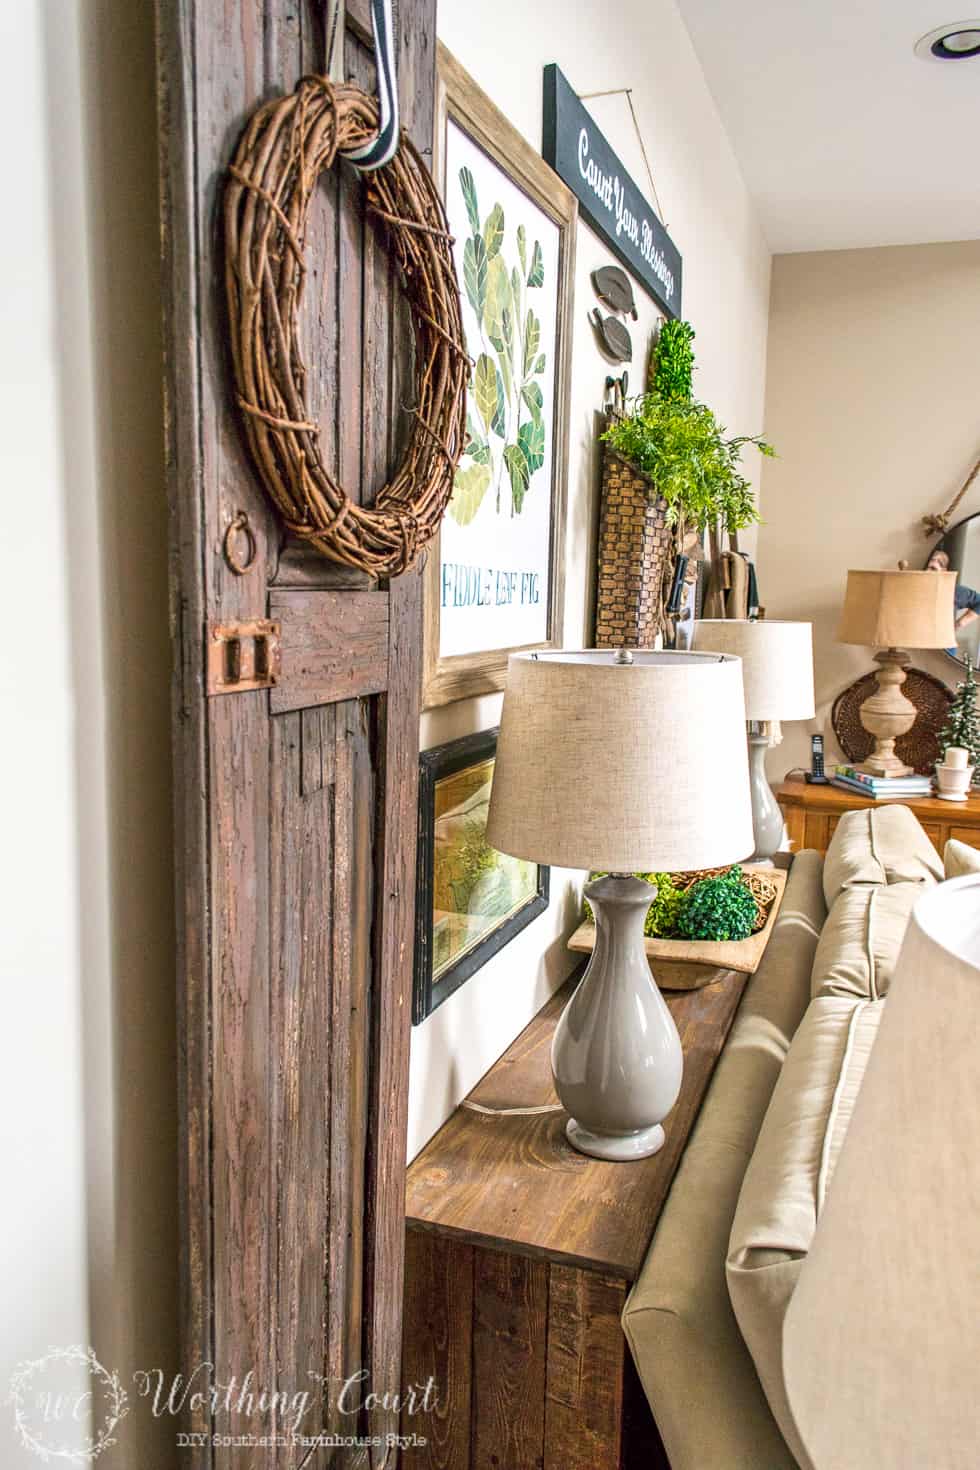
Problem #2 that needed solving was that even with the expanded gallery wall, my sofa was shoved against the wall, which left this too-large empty space in the middle of room. Having plenty of room to move around is nice, but this was too much space for me. My solution was to build my own farmhouse sofa table, which moved the sofa out into the room just enough to get rid of that too empty feeling. This DIY farmhouse table is another super easy and very affordable project that you can build for you own home!
Before I get started on the tutorial, let me talk a little bit about why I wanted a sofa table in this spot. Maybe you have some of these same issues too.
- It’s nice to have a generously sized family room, but my furniture felt too spread out. There was too much space between the fireplace (that’s located on the opposite wall) and the front of the coffee table. The room felt empty and wasn’t inviting at all.
- We have an overhang above the sofa and I just didn’t like the sofa shoved all the way up under it against the wall.
- Even with two lamps already located on this side of the room, it was still too dark for me.
Here’s a picture of the space shortly after we moved in – this should help you get an idea of what I’m talking about. The entertainment center isn’t put together, there’s no rug and there’s no gallery wall either. Oh, and there’s tons of sheetrock dust everywhere.
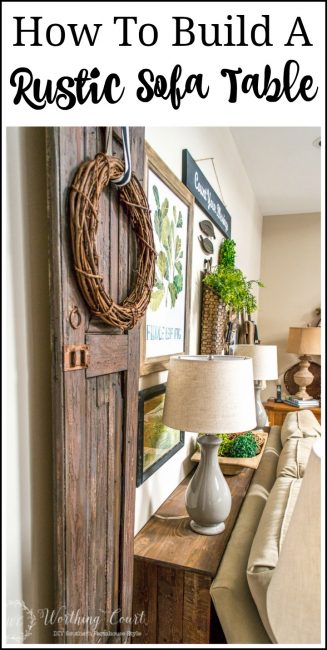
Here’s a shot of the sofa side of the room today. I’ll have a shot of the whole room when I do a full family room tour soon. UPDATE: Click HERE to take the full tour of my finished family room.
Let’s get started. The dimensions given in my tutorial are for a table that measures 32.5″ high x 78″ wide x 12″ deep. You can build any size table that suits your needs and adjust the dimensions of your cuts accordingly.
Supply List:
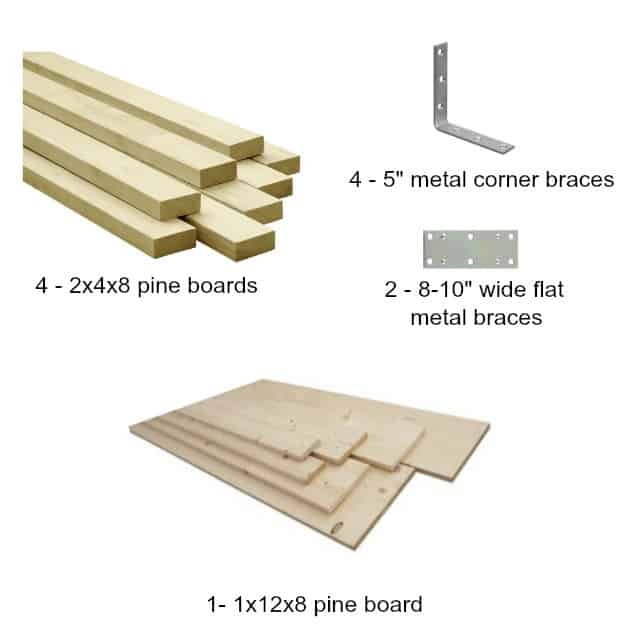
You’ll also need: wood stain in your choice of color (I used Minwax Special Walnut), a level, a drill or screwdriver, a saw (or ask the store to cut the wood to size for you), wood glue, a clamp or two and wood screws.
Remember – safety first! Wear protective eye gear when cutting the wood. You may also want ear plugs to protect your ears from the noise of the saw and a respirator mask to keep from inhaling the stain fumes.
Assembly:
Step 1 – Stain each of the wood pieces and allow to dry. I stained most of my wood on the front and back, but there were a few pieces that I didn’t stain until the table was completely assembled.
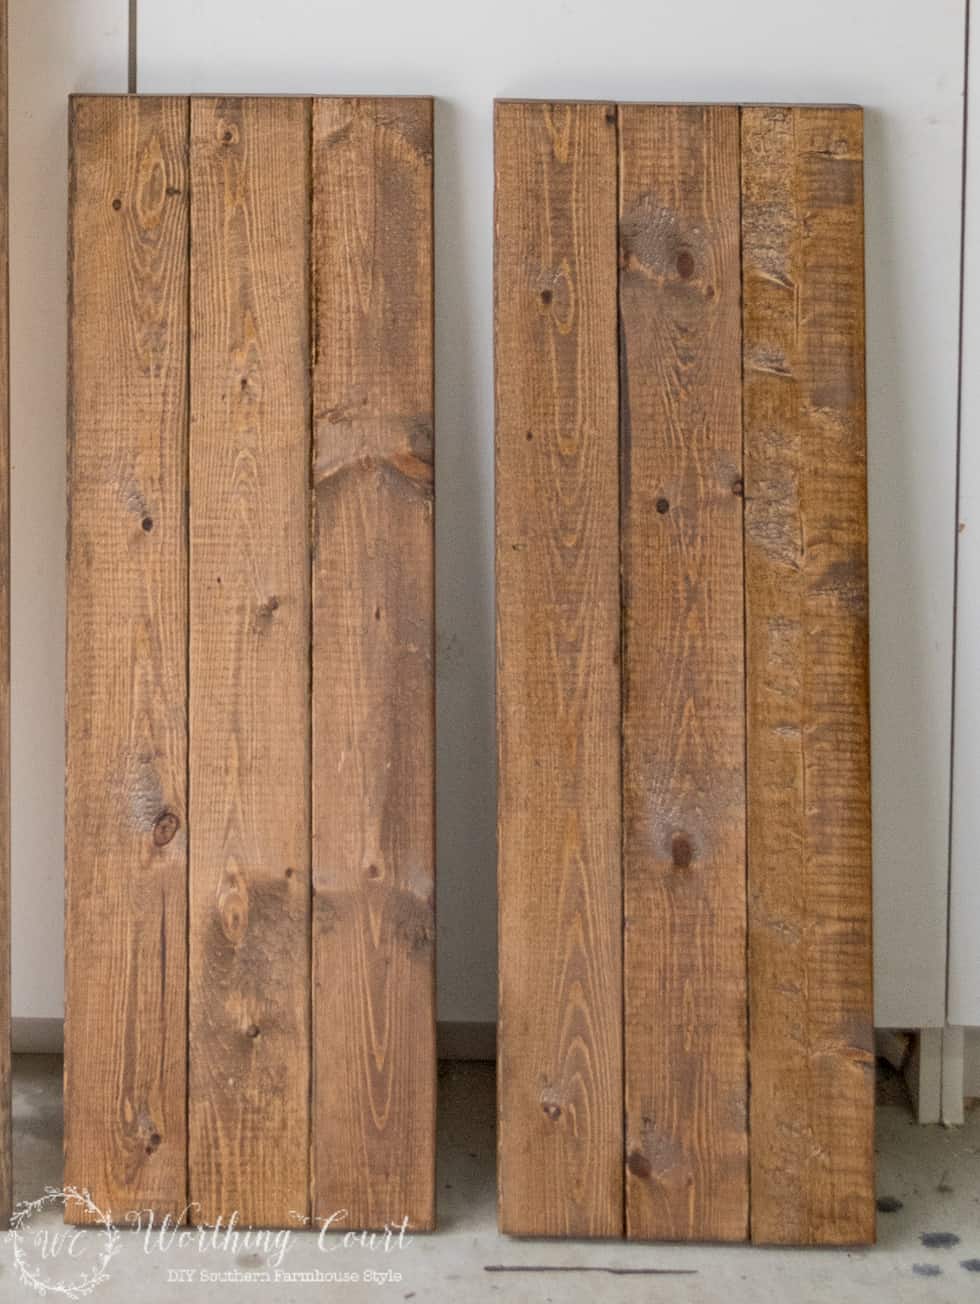
Step 2 – Make the legs for the table by cutting six 2×4’s to 31.75″ long each. Place three pieces of the cut wood side by side and run a bead of wood glue along the sides to glue them together. Make sure that the legs are straight and even across the ends. Clamp the glued pieces of wood together and allow the glue to dry according to the directions on the glue bottle.
In this photo, you see two sets of legs, one for each end of the table, that have been stained and glued together.
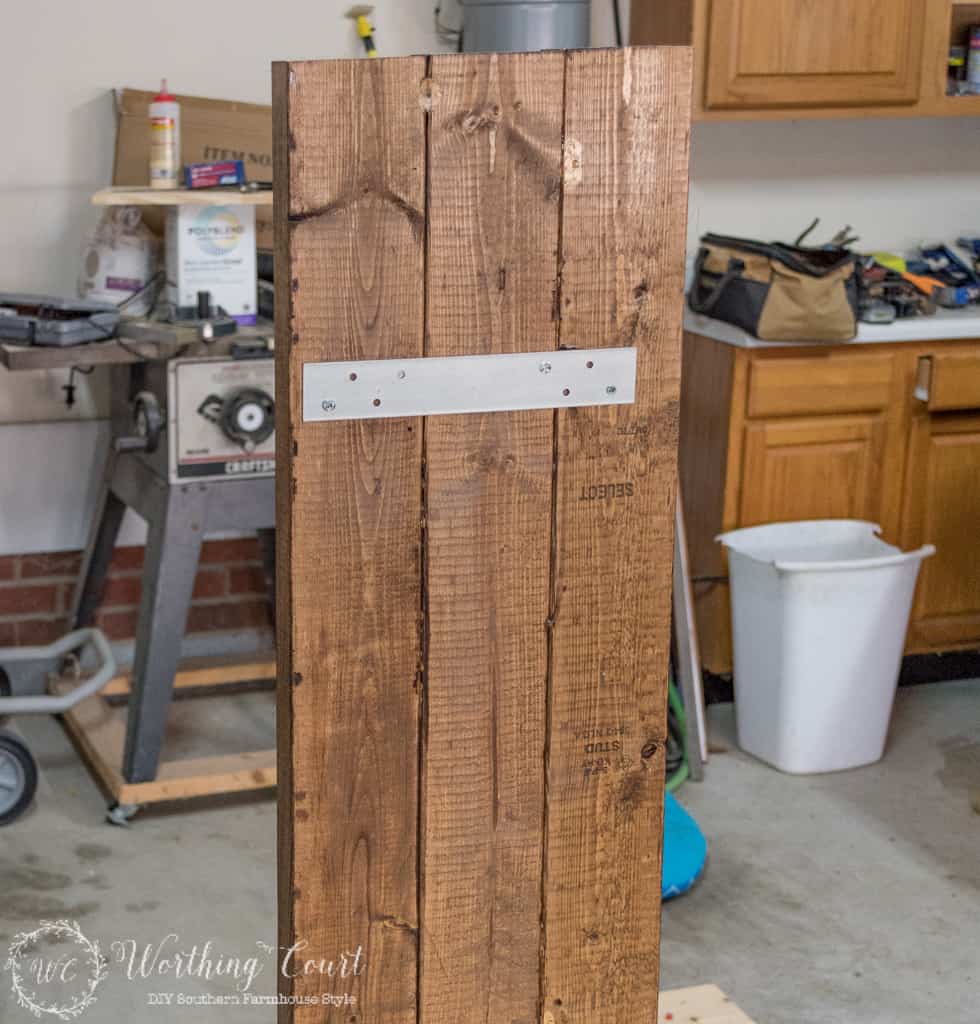
Step 3 – Attach one of the flat metal braces to what will be the inside bottom of each wooden leg using wood screws. Make sure that the screws aren’t so long that they go all the way through the wood. This just gives added stability to the legs.
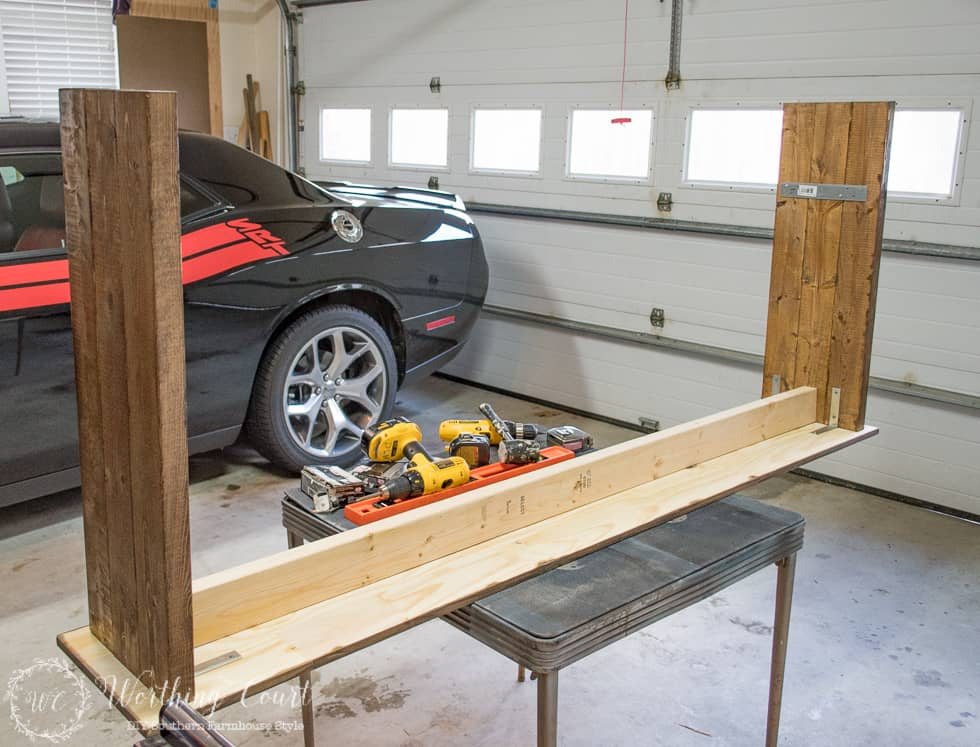
Step 4 – Lay the long 1×12 board upside down and attach each of the legs to the ends using the L shaped corner brackets and wood screws. Position the braces so that you leave room to add a center brace. I set each of my legs in from the end of the board by 1.5″. Remember to turn the legs so that the side of the legs with the attached flat brace is to the inside. Make sure that the wood screws are short enough that they do not go all the way through the wood.

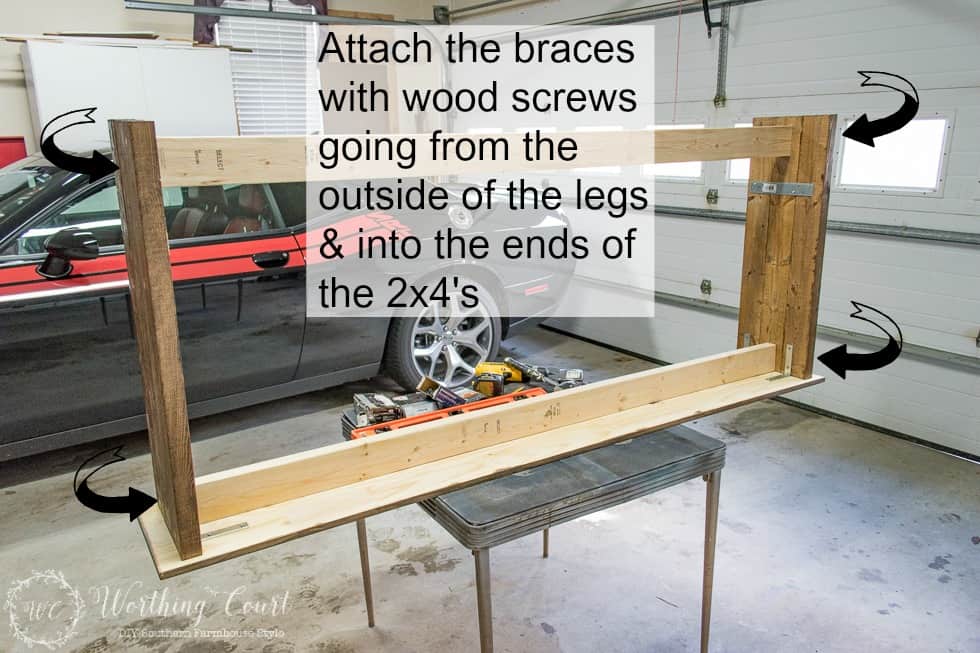
Step 5 – There are two center braces. Cut each of the remaining 2×4’s to fit in between the inside of the legs. The first brace goes under the table, against the bottom of the top. Position the brace in the middle of the table top. Turn the 2×4 on its side and attach it with two wood screws that go through the outside of the table legs and into the brace. BTW – Pookie is more than happy for you to get a look at his pride and joy.
Step 6 – Attach the second metal brace down toward the bottom. Cut the last remaining 2×4 to fit in between the legs. Use the level to make sure the brace is level from side to side. Then attach with wood screws going into the end of the brace from the outside of the legs.
Step 7 – Apply stain to the rest of the surfaces and allow to dry. Then I also swiped the stain across the metal pieces to dull them down a little. I chose not to apply polyurethane to the table after it was stained, but that is certainly something that you can do.
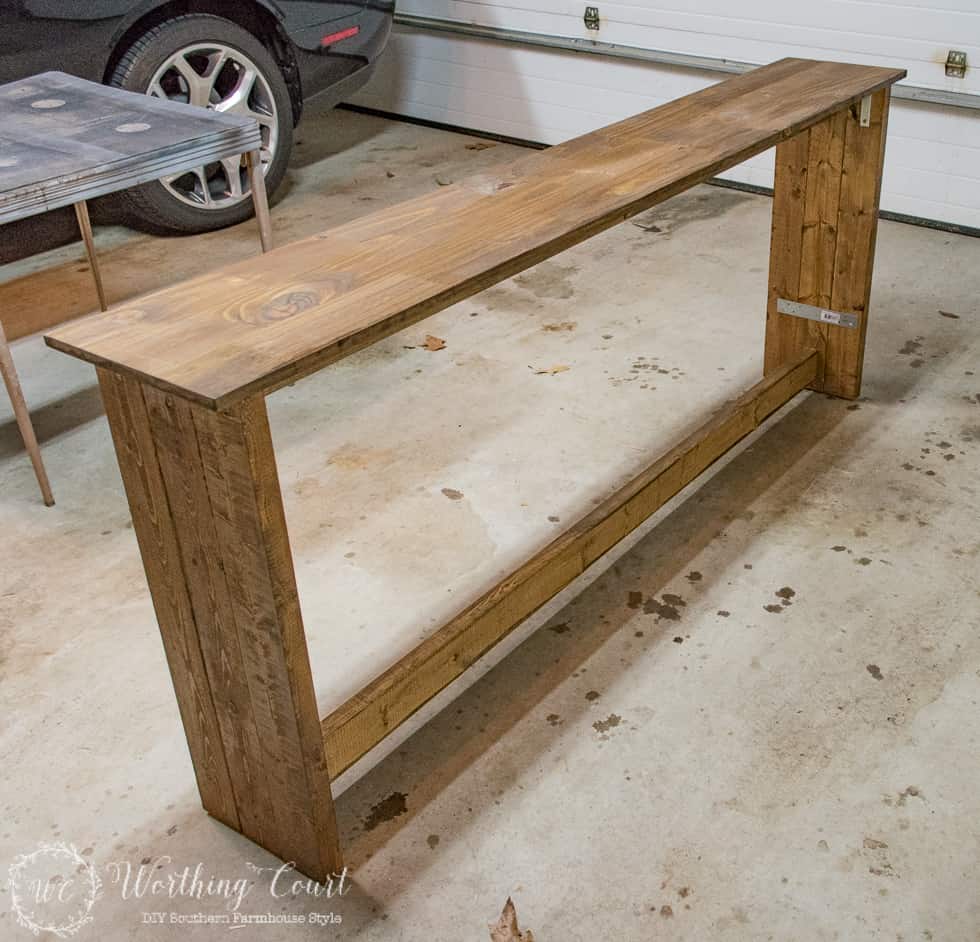
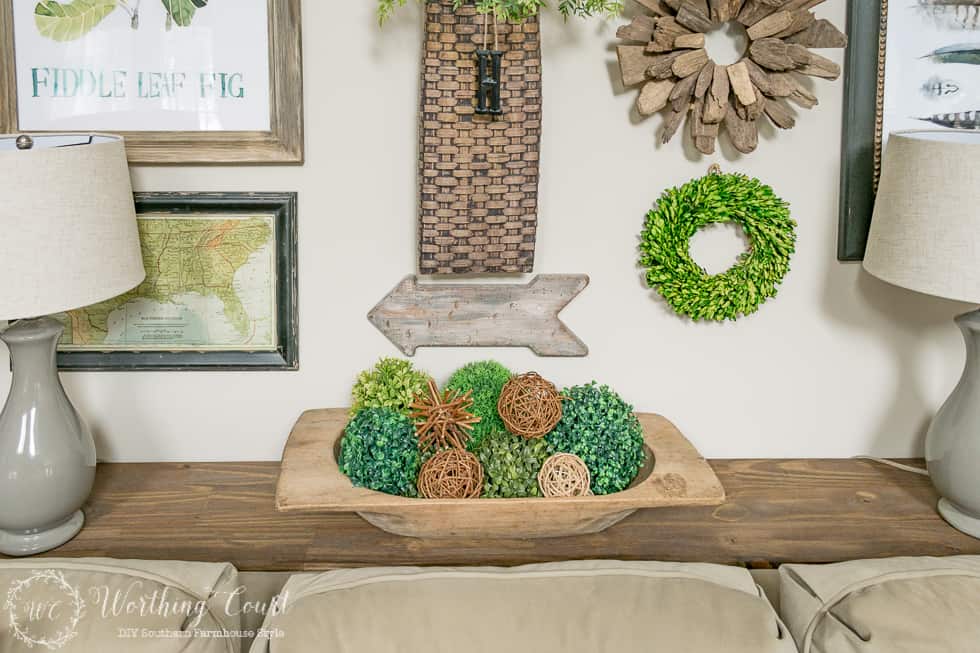
Now I love the addition of the farmhouse sofa table to our family room. The whole rooms feels as cozy and inviting with a rustic feel!
I’m really looking forward to changing what I display on the top f the farmhouse table for the different seasons and holidays.
Pin it for later!
Sharing at THESE great parties.
My husband recently made me a sofa table, that I love. My problem is the sofa cushions are a lot higher than the back of the sofa, so my lamp and other stuff I have on my table are partly hidden. Should I put something under them to make higher or start over?
Hi LeAnn. I purposely built my table to be that way because I didn’t want to lean my head against my cushions and possibly hit the edge of the table. Plus, I didn’t think that I’d want to always see the top of it from across the room or something. BUT – I’ve found that there are times when I want whatever I’m displaying to be up a little higher, so I’m planning to build a box that is almost as wide as the table, 2-3″ tall and 12-18″ long that I can place things on to raise them up.
Love it! We have a 3 piece sectional that (despite my best and constant efforts) refuses to stay together. I have long thought of putting a sofa table behind it to help keep it in line – this might very well be the year!! I actually have all the tools I need to make two of these to suit my needs – thanks!!
I love the way your room turned out. My family room is similar , not quite as large but I am having a hard time arranging furniture without having it shoved against the wall. It’s a work in progress. We purchased our home just a year ago. I can’t wait to tackle it and I think I will try the sofa table.
What an economical solution to pulling the room together! I’ve always loved sofa tables, but my family room dictates that the couch be in the middle of the room – table envy!!!
I love your sofa table. It adds just the right touch. It is very doable, even for me! Thanks.
Great idea and cute table!
Another great tutorial! Already hinting my hubs to help me make it! Keep the ideas coming, Suzy!
Thanks for the great photos for the sofa table project. No fancy cuts so I can do it. Love it!
Love your space. Love how you take the time to show how to do it.
Your room looks great. A table like this is on my to do list, not only for looks but to keep sofa from banging against wall. . My concern is, when sitting on sofa do you ever knock the lamps over? You
Hi Steph. No, the lamps are above my head and far enough away that we’ve never had a problem with the lamps getting knocked over. 😀
Thank you for the tutorial on the table. That piece of furniture really does make a difference in the room. That is a “cool” looking car in the garage.
You always have such ideas!! Thanks for sharing.
I love the sofa table, and the whole room! I have a small home with an open concept living room/kitchen since we took a wall out that divided the rooms and made a vaulted ceiling. It is very hard to arrange the furniture to look cozy, and I have my sofa a few feet away from the wall so there’s less of an open space in between it and the tv and wood stove. Making a table like yours would be awesome with the lamps for extra light. Thanks for the idea!
I love your sofa table and the gallery wall. I am always admiring all of your new and updated renovations! They look amazing!
Looks Awesome!
Love your wall, an amazing room transformation.
I love the look of your sofa table behind your couch. Thanks for the build instructions!
Such a great look!
Great gallery wall, lots of interest.
I love your sofa table! I want one!!
I am obsessed with that beautiful dough bowl!