How To Make A Faux (Or Real!) Garden Clock
Step by step directions for how to make a faux “living” garden clock using a repurposed tabletop and colorful gardening tools. Cute for indoors or outdoors.
This was one of the most fun and entertaining diy projects that I’ve ever done. I was amazed at how easy it was and love how it turned out!

One sweltering day during the summer, I went on a junkin’ trip with my friend Amy from Atta Girl Says. We both found lots of treasures that day, but we were especially on the lookout for something we could use for a project for the Chic Chateau Showhouse. Don’t remember what that is? It was a designer decorated showhouse where the proceeds benefited a local charity.
The whole premise behind the decor for the showhouse was “repurposing and upcycling”. Everything was for sale at the end of the show for great prices. Take the full tour HERE if you haven’t seen it. The designers filled all of the rooms with so many great projects, so there are tons of ideas to inspire you.
Back to the project. Amy wanted to repurpose a changing table into a potting bench, which you can see above. Isn’t it just the most adorable thing?!?! Click HERE to see how she accomplished the amazing transformation. I wanted to make a garden clock that could be displayed along with the potting bench.
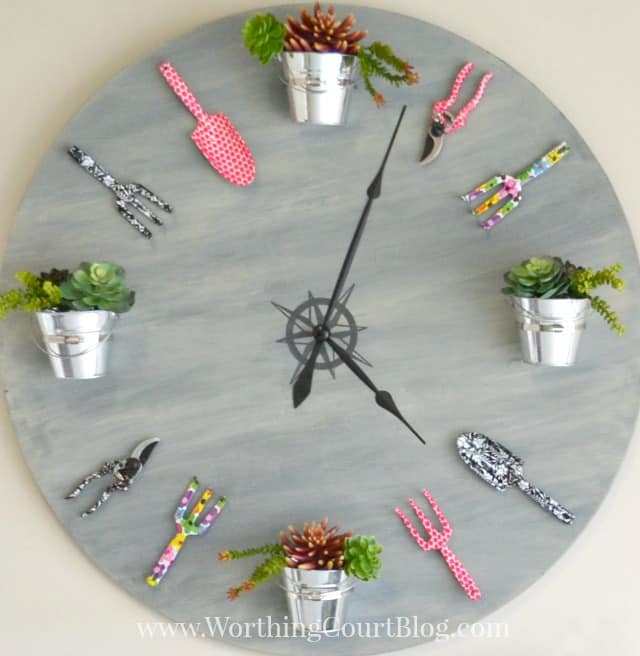
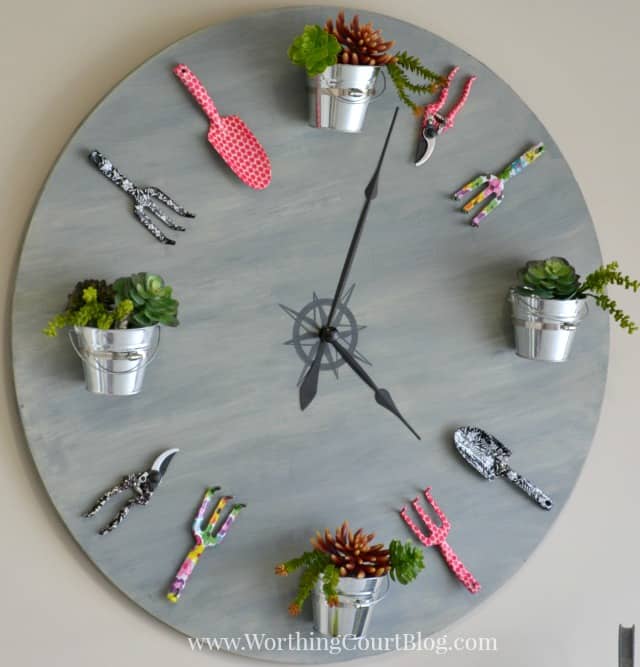
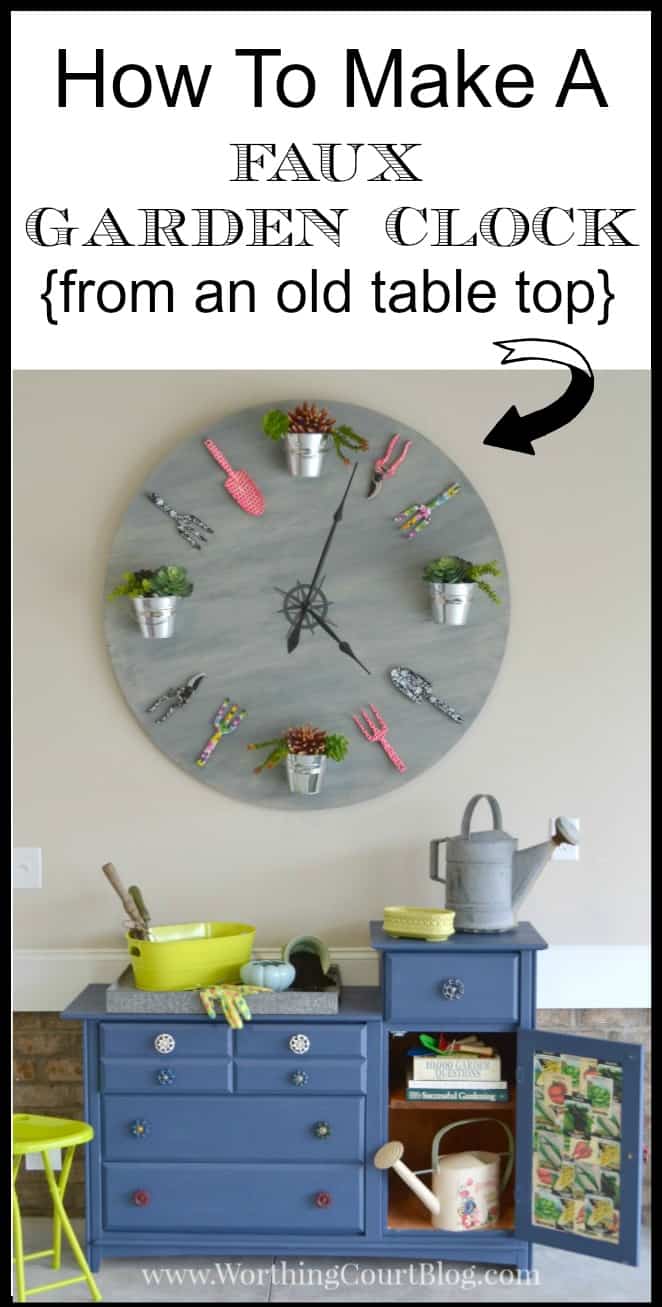
I had a vision in my head. Instead of a clock with rusty, crusty gardening tools, I wanted one that would be bright and cheerful. Thus my choice for new and colorful gardening tools to be some of the “numbers”.
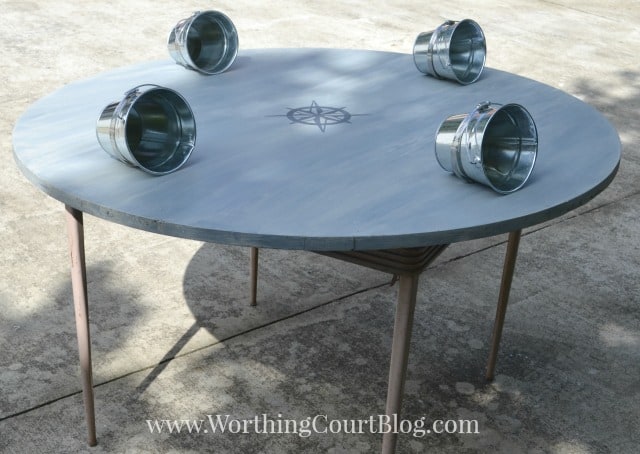
I also wanted it to be a living clock, so instead of a gardening tool, I placed a galvanized bucket at the 12:00, 3:00, 6:00 and 9:00 positions on the clock face.
You’ll find all of the supplies and resources are below.
If I were making it for myself, I would have put live plants into the buckets, but since this was going to be in showhouse for two weeks (and couldn’t be watered), I opted for some faux succulents to fill my buckets.
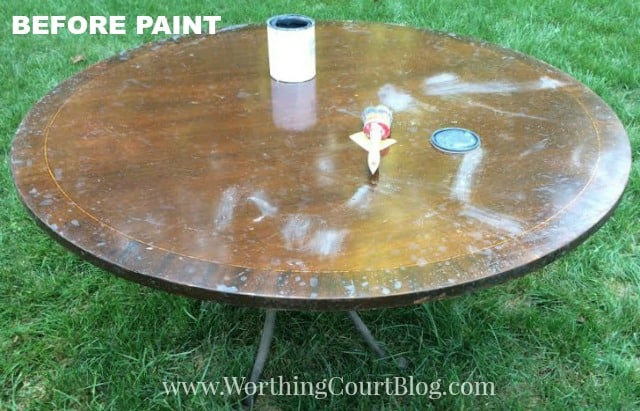
I had assumed that I’d have to use an old pallet or reclaimed wood and was dreading trying to cut a perfect circle, but we came across an old tabletop for $5 – perfect!
At the time, we had our old house up for sale and renovations were going on at our new house, so there was no place for me to set up to paint to create a faux weathered finish on the tabletop. Fortunately, Amy volunteered to help me out by taking the table to her house to paint.
Amy applied a base coat of gray chalk paint, then topped it off with a some watered down white chalk paint to achieve the weathered look I was after.
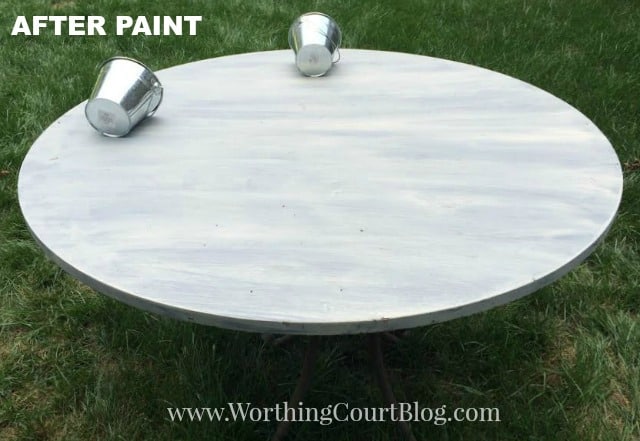
And then this puppy came home to me so that I could finish it up!
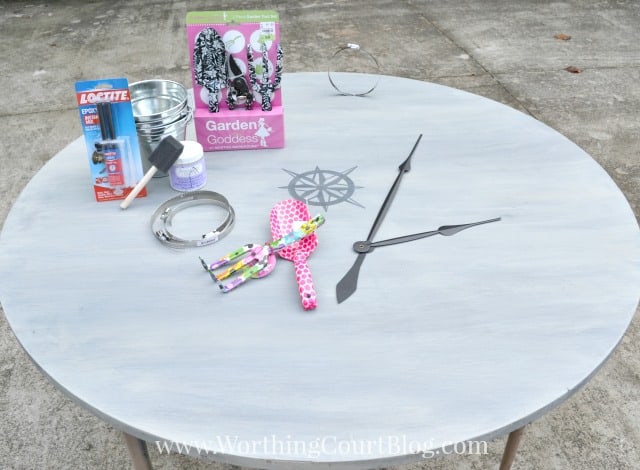
SUPPLIES YOU’LL NEED:
Round table top or wood cut into a circular shape, measuring 30″, 36″, 42″ or 48″. If you don’t have access to a table top, you can purchase unfinished ones very affordably – 30″ can be purchased HERE and 36″ can be purchased HERE.
Gray chalk paint – available HERE.
White/off white chalk paint – available HERE.
Clear outdoor sealer, especially if your clock will be hung outdoors – available HERE.
Paint brushes and rags for wiping paint to achieve the weathered look.
2 “D” ring picture hangers – available HERE.
4 galvanized buckets – available HERE.
4 adjustable pipe clamps to hold the buckets – available HERE.
4 wood screws to attach the pipe clamps to the table top.
Screwdriver – my favorite battery operated one is available HERE.
Gardening tools of your choice – the type that I used are available HERE.
Plants, real or faux
Compass shaped stencil or sticker – stencil available HERE.
Clock hands – shorter size available HERE, large size available HERE. Note that the size of the hands you use will be determined by the size of the table top that you use.
Round wooden cabinet knob – available HERE.
Black craft paint – available HERE.
Epoxy glue – available HERE.
HOW TO ASSEMBLE:
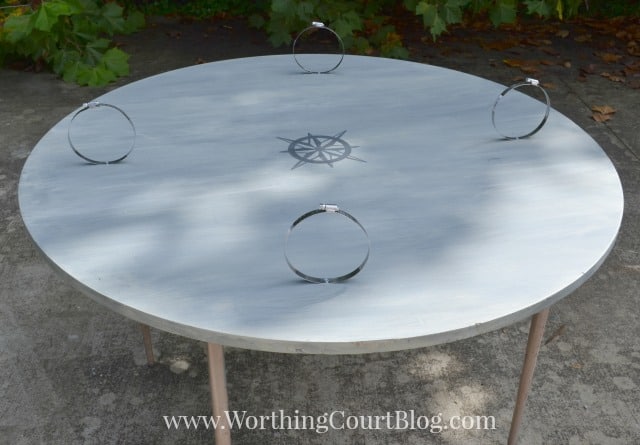
1. BEFORE painting or attaching anything to the front of the table top, attach a “D” ring hanger on each side of what will be the back of the clock. Make sure the hangers are placed more than halfway to the top and that they are perfectly straight across from one another – or else your clock will hang crooked.
2. Paint the clock face. If you desire the same weathered clock face as this one, apply as many coats of gray as needed, then apply a coat of watered down white paint and wipe the excess off with a rag or paper towel. Allow to completely dry.
3. Paint the compass (using the stencil) or apply the compass sticker in the exact center. I only wanted the image of the compass, so I chose not to stencil the N, E, S and W letters on mine.
4. If this will be hung outdoors, I recommend sealing the paint with a clear outdoor sealer.
5. Taking into consideration the location of the “D” ring hangers, attach the pipe clamps at the 12:00, 3:00, 6:00 and 9:00 positions, using a screw to attach each one to the clock face. Adjust their opening to fit the circumference of your pots.
Here’s how it looked while I checked the opening of the pipe clamps against my buckets.
6. I don’t have a picture of this step, but paint the wood knob black. It will be used to look like it is what’s holding the clock hands in place. Using the epoxy, glue the hands to the center of the compass medallion and then glue the knob to the top of the hands (where the hands would normally be attached).
7. Without gluing, place each garden tool in the positions to represent the rest of the hours on a clock face. It’s best to do this before gluing because you’ll probably have to make adjustments.
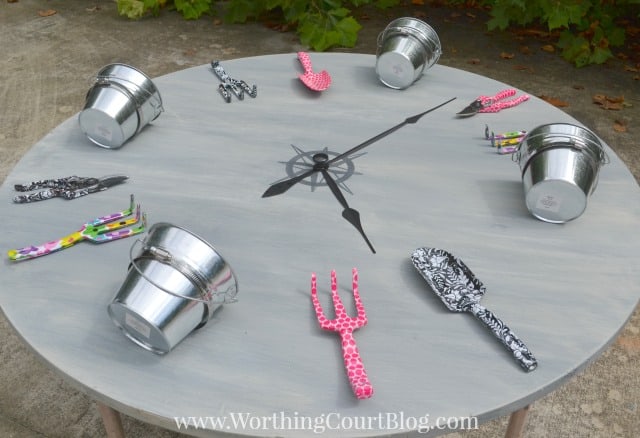
8. Once you’re happy with the placement of the tools, glue them in place and fill the pots with plants. You’re done!
If you choose to make your clock functional, you’ll need a high torque clock mechanism that will operate longer clock hands – available HERE.

This idea is beyond awesome! I absolutely love the potential of being able to use it both indoors and outdoors as well as the gorgeous color palette. Brilliant! 🙂
This is fantastic! I have never even thought of doing something like this for outdoor decor. Super excited to try it out! Thanks for sharing!
How absolutely adorable!
What a fantastic project! I love the garden clock, Pinning.
Suzy,
I love your garden clock! I wish I had a dedicated gardening corner at my house! This would definitely be on the wall! I am getting ready to start hosting a new link party with Refresh Living starting this coming Tuesday @ 7pm CST. We would love to have you join us!
Thank you!
Cat
This is so pretty and so creative. I absolutely love what you have done with it. I totally want to make one for my front porch. Thank you for sharing at Motivational Monday Link Party! Hope to see what you have been up to again this week.
Bethany from The Southern Couture
I love this garden clock! I love all the colors and how large it is. Very creative, thanks for sharing at Motivational Monday this past week 🙂
I love this so much! I need to make one for my porch or the side of my shed. It would be perfect! Thanks so much for linking up to The Creative Exchange. We will be featuring your project this week.
xo,
Laura
This is so cute! I love it. Thanks for sharing the tutorial st the party! Pinned & shared. Hope to see you again soon.
This is such an adorable idea! How very awesome! Thanks for sharing with #SmallVictoriesSundayLinkup 5/31/15
OMG, I love this idea! I’ve been thinking of something to put up on my shed. No more, I’ll be making this in the early spring to enjoy throughout the planting season!!! Thanks for the great idea, again!