The Evolution Of A Farmhouse Breakfast Area
I am sharing the evolution of my farmhouse breakfast area, with all the decor details and decisions I made!
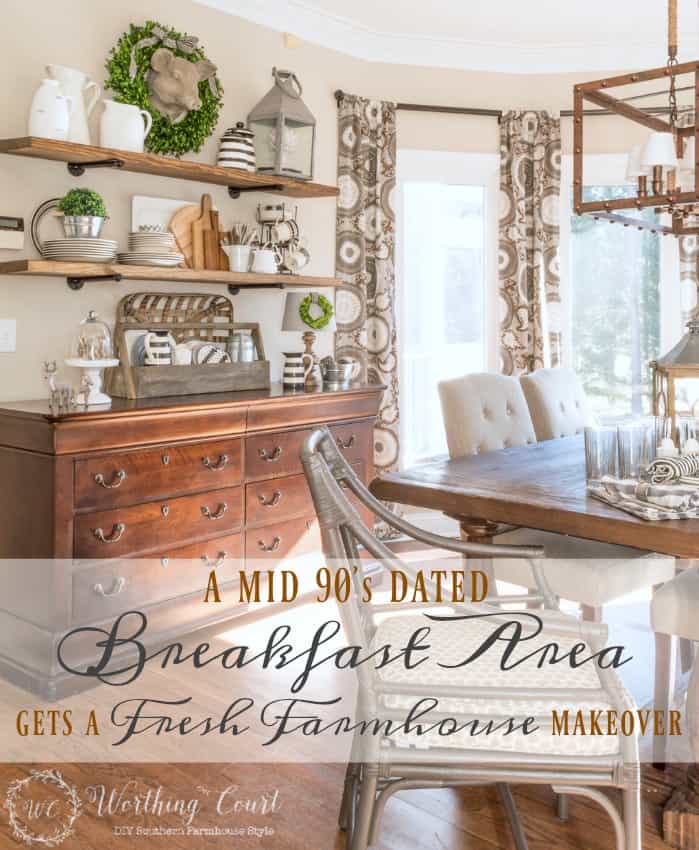
Once we completed the major remodeling projects in our new-to-us, twenty year old home, it took me a full year to get my breakfast area looking just the way that I wanted it to. I had several starts and stops and several fails along the way, but I can honestly say it was one of the most fun makeovers that I’ve ever completed. So – for this week’s “Best of Worthing Court”, I’d like to take a look back at that dining room space and just how far it has come. This room includes several easy and affordable DIY projects that you can copy and incorporate into your own home!
I shared when I came up with a kitchen and table linens storage solution, when I added a large printable above the bench (you can download a 9×11 copy of the printable HERE), when I made some changes to the gallery wall for fall, when I replaced the gallery wall with diy rustic industrial shelves and most recently was when I shared my Farmhouse Christmas Kitchen with you. But I wanted to come back today to take a closer look with all of the Christmas decorations removed and with the whole area pretty much back to normal.
And BTW – you can read all about the fun DIY projects that I did for this space and get the tutorials HERE.
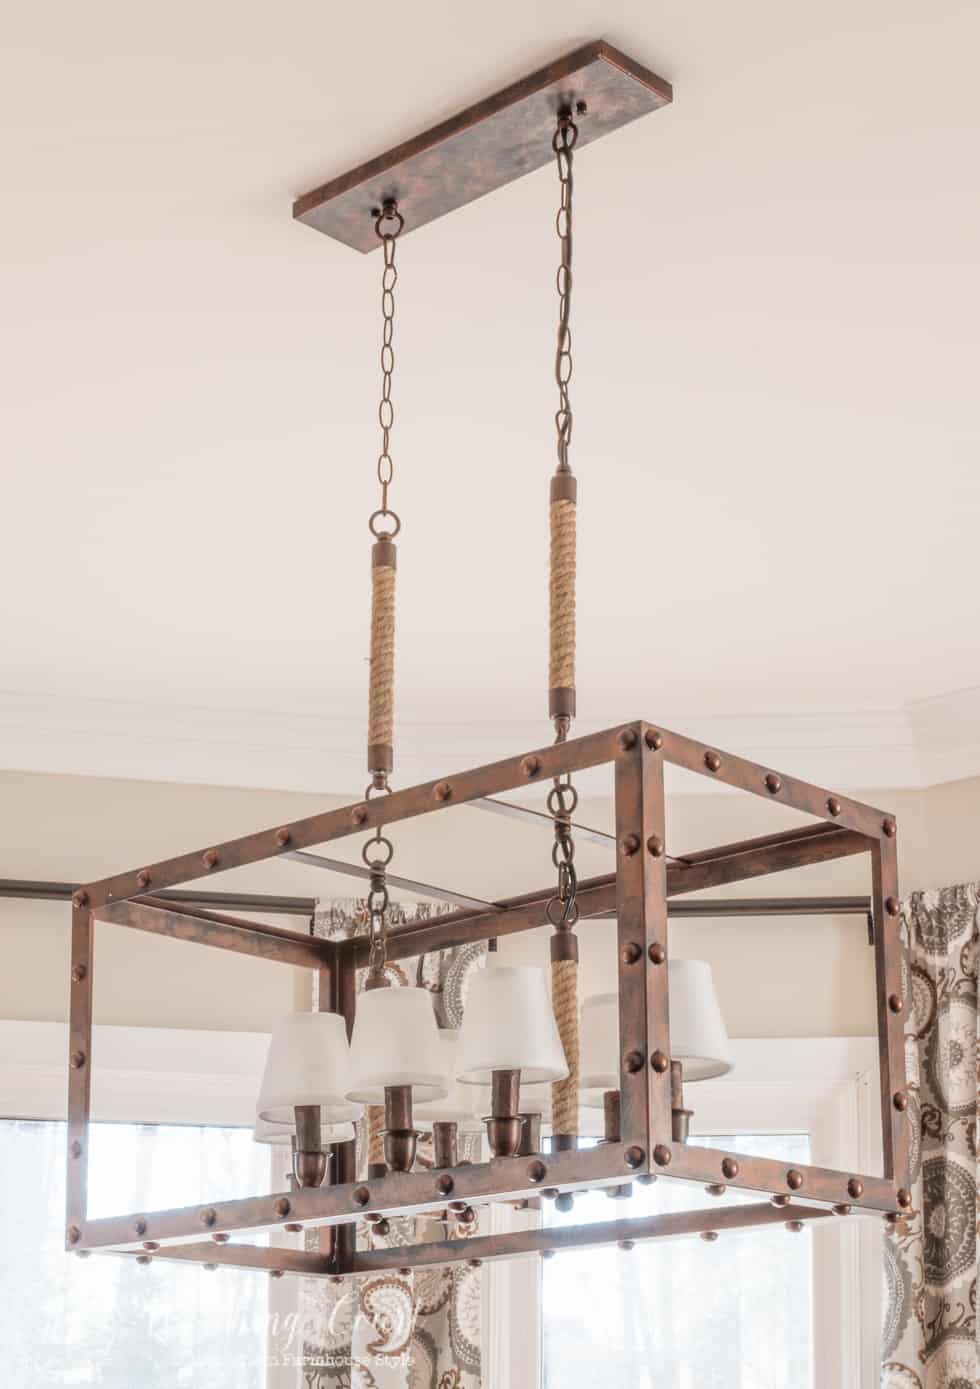
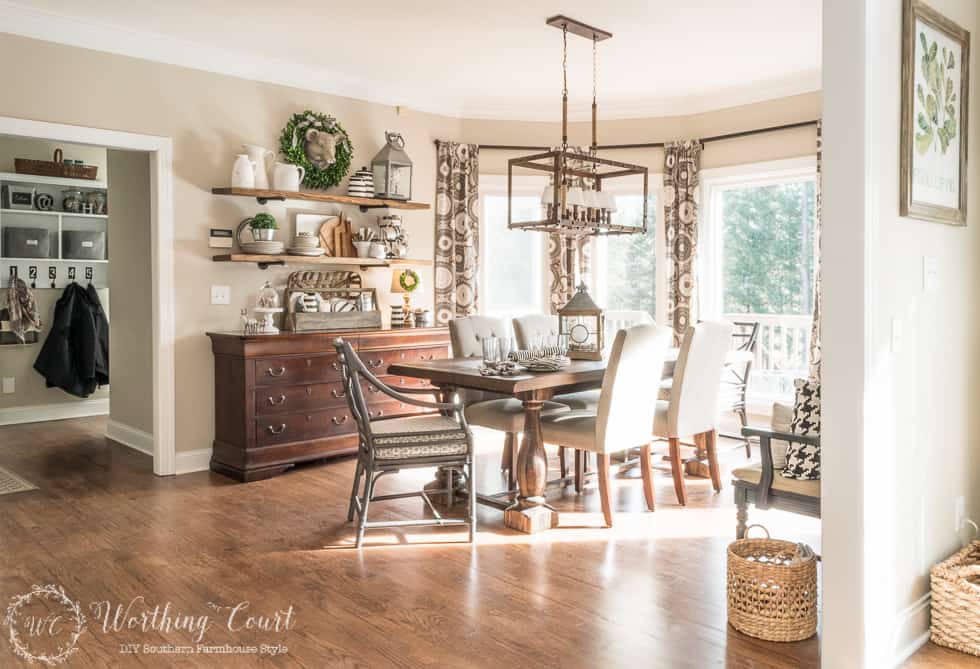
The first new addition to the farmhouse breakfast area is an amazing new light fixture. Have you ever added something to a room and then realized that it was just what the space needed? That was the case for me when this rustic/industrial beauty of a light that was installed. Oh, how I love it!
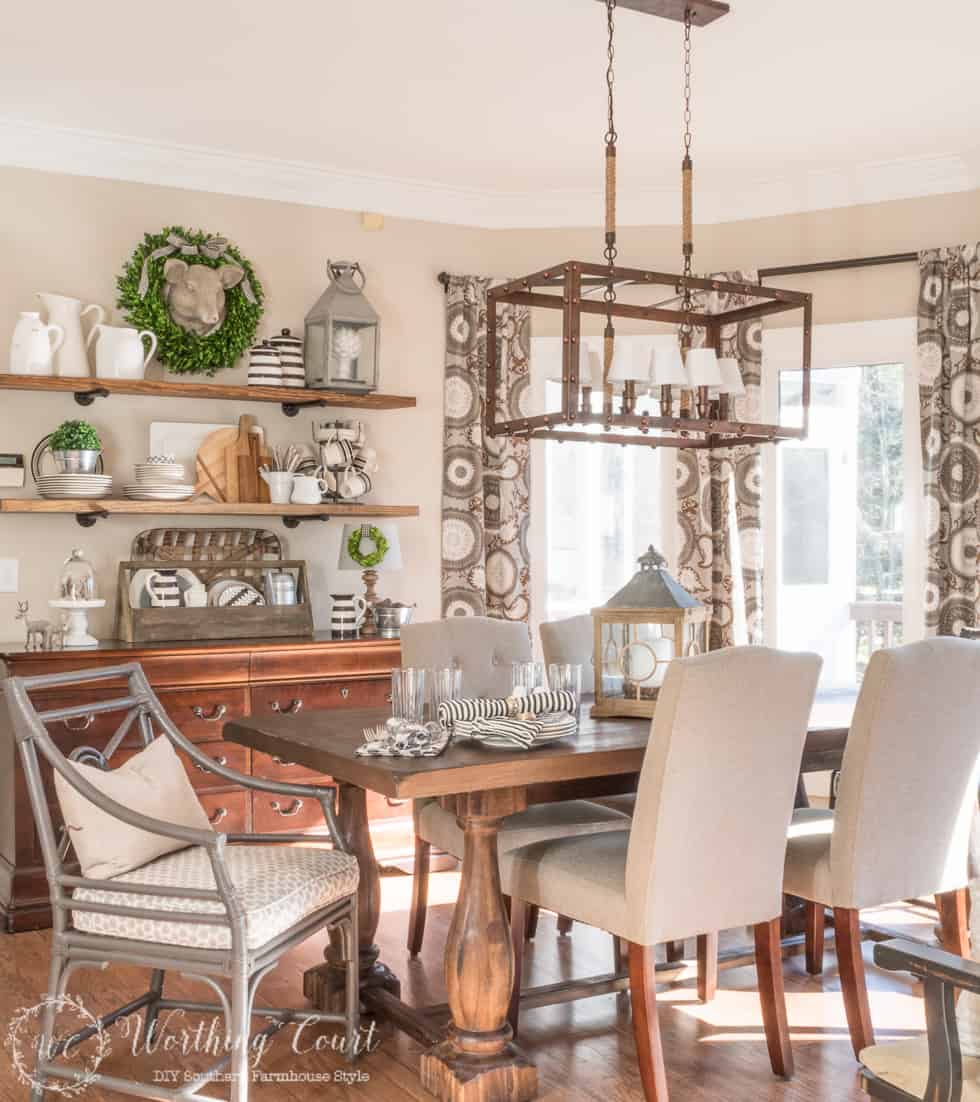
I admit that I was a little afraid when I pushed the button to order this light fixture. It sounded so much larger than the dinky one that was previously in this space. Even though I felt that the size of it was exactly what this area called for, I was relieved when it was hung and looked just right. Just look at all that rope and nailhead goodness.
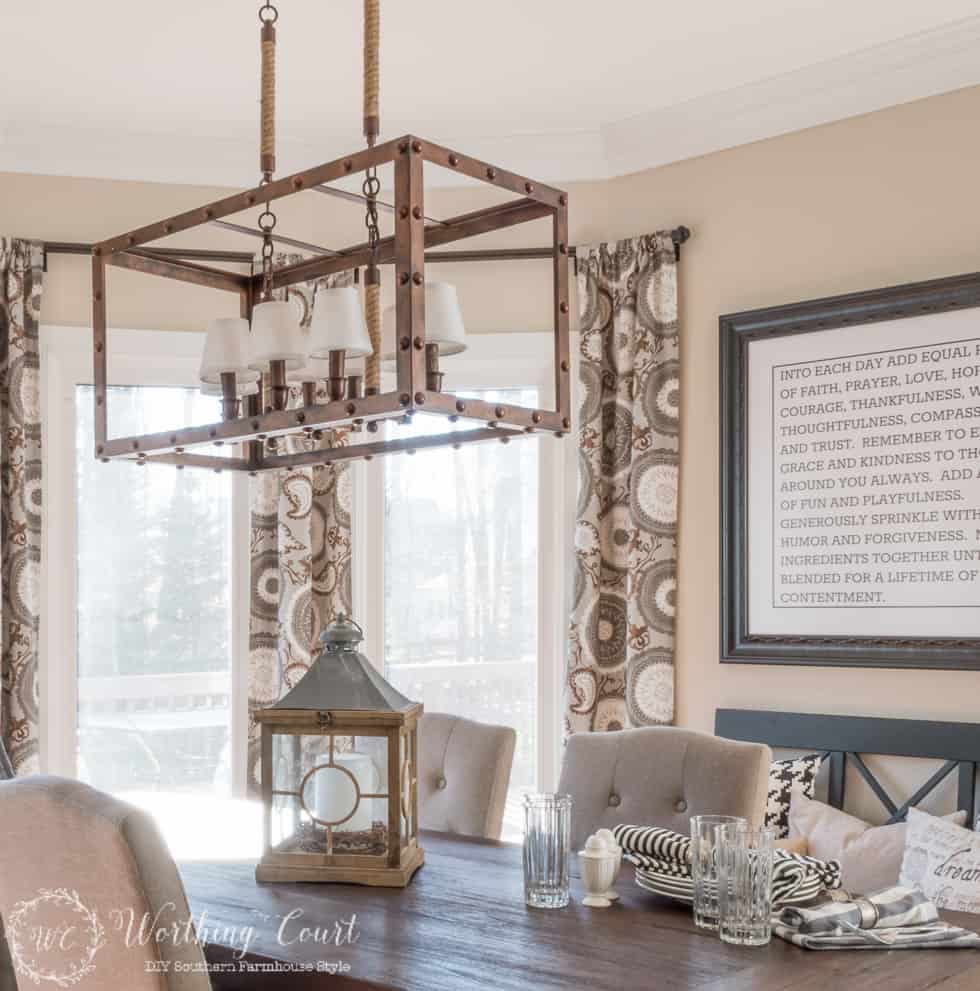
I definitely think that a DIY installation of a light fixture this size is a two person job. Pookie installed it along with some help from my daughter’s fella. It isn’t that the fixture was hard to install – the connections are just like any other – but this was a bit too heavy for me to help him with. I would say that the hardest part of the whole installation was getting the plate that goes against the ceiling perfectly lined up so that it was straight.
Here’s a closeup of the fixture. Did I mention all of the rope goodness that’s going on? What you can’t see in this photo is that rope is also wrapped around each of the lamp arms. Swoon. And the nailheads? I die.
I’ve mentioned before, that our breakfast area sits in one of two turrets that are on the back of our house (the other is in our master bedroom). I love, love, love the panoramic view that it provides of our back yard, but it was a bit of a challenge to come up with window treatments that were a) affordable, b) easy to install and c) didn’t block any of the view. I always thought that I would go with diy faux roman shades on each of the windows, but decided that they wouldn’t be quite right in this space. My solution was an affordable, no-sew, drapery option. You can see how I put the whole window treatment together HERE. BTW, that’s the granite on the corner of the kitchen island that you see in the lower left corner in the photo.
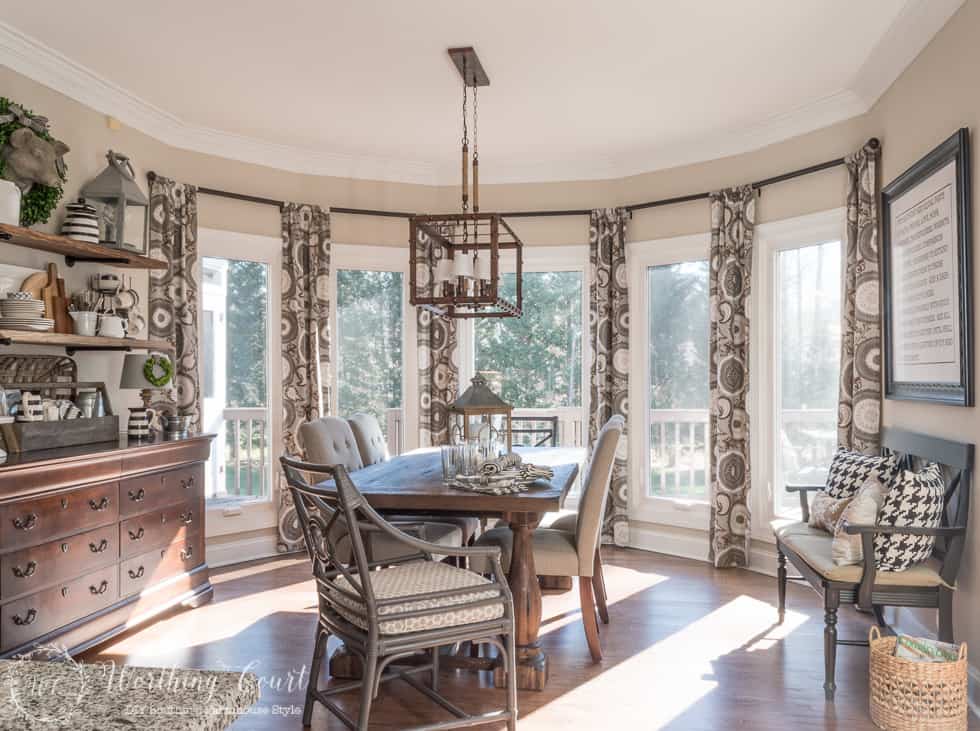
I almost always think that window treatments give most any room the finishing final touch that it needs. In this case, they help to enhance the view instead of blocking it or detracting from it. My windows aren’t that dirty – it’s just the glare from the sun!
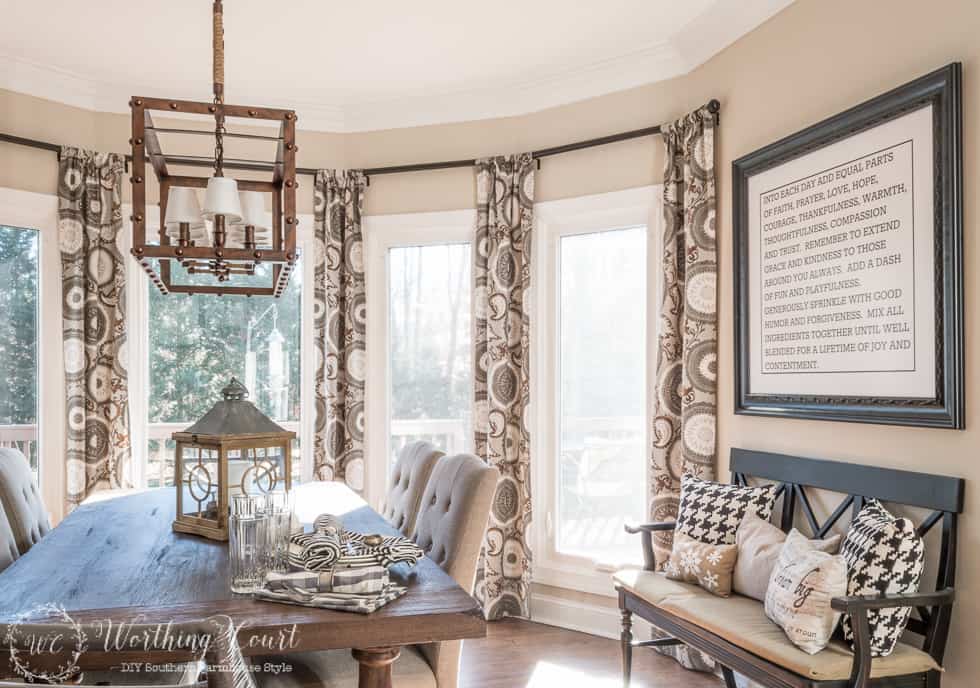
Plus, the grays, whites and browns in the pretty drapery fabric tie in perfectly with the rest of the room.
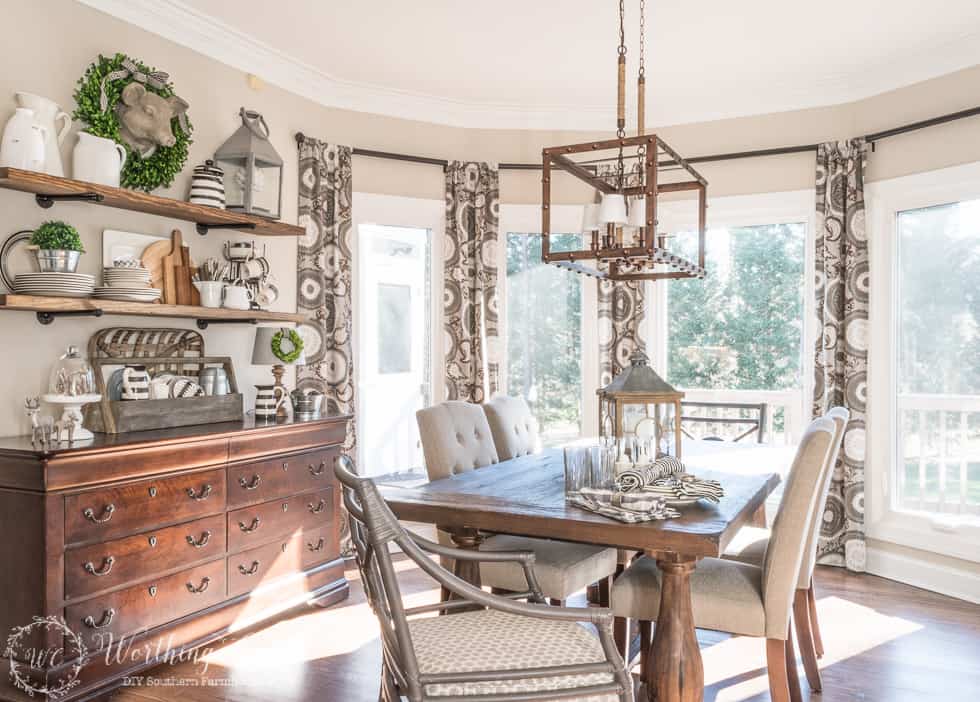
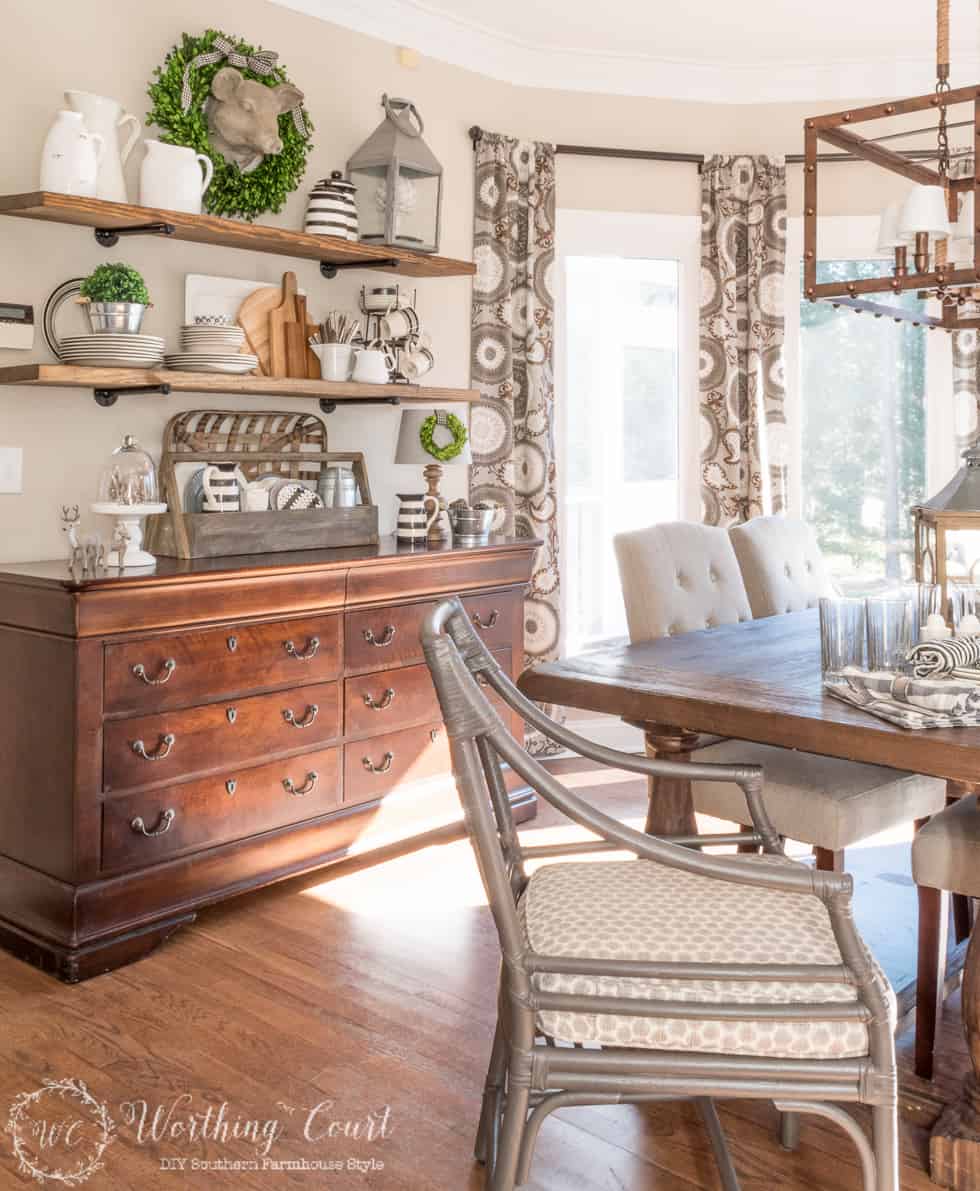
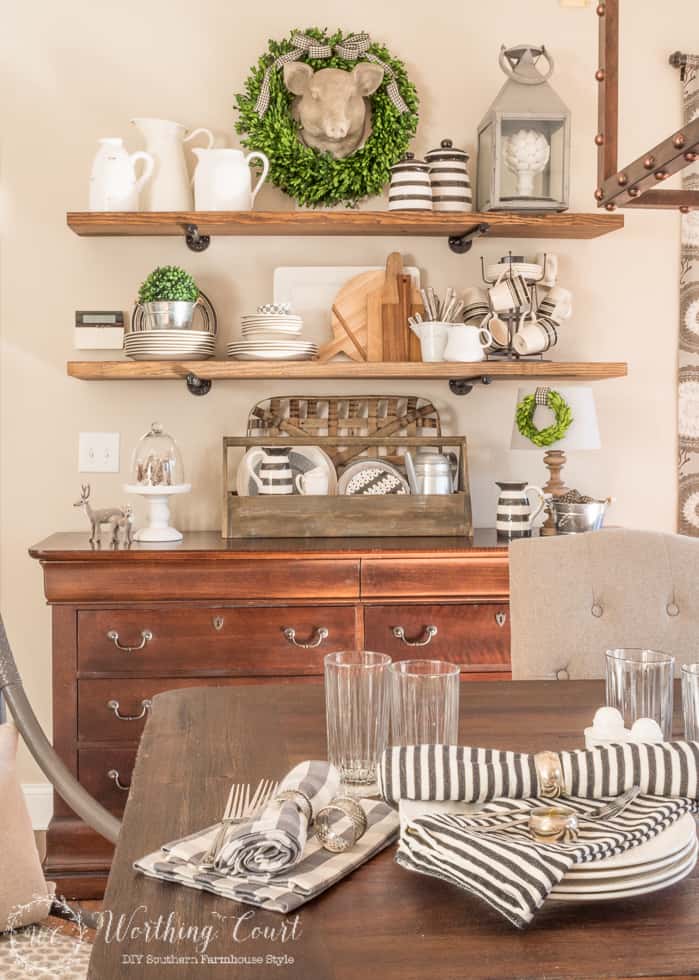
Over on the sideboard, I replaced a few things after I removed the Christmas touches that I had added. I filled my vintage looking toolbox with an assortment of black, white and gray dishes. How cute are the black and white striped pitchers? I found them in the dollar spot at Target last week. Did you spy the wood block that I used to raise the pitcher in the toolbox higher? Shhhh…don’t tell.
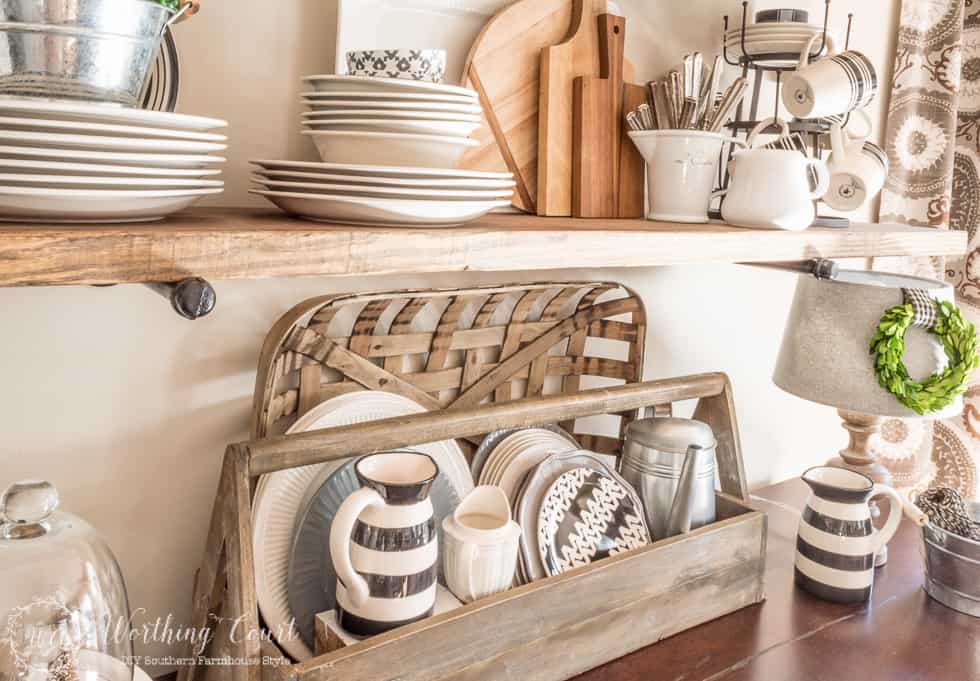
I added a little touch of holiday winter with a few sweet deer Christmas ornaments and neutral bottle brush trees under a cloche.

I allowed Mr. Wilbur to keep his position of authority, but removed the small silver Christmas ornaments that I had tucked into the wreath. I replaced the ginormous Christmas pinecones with a lantern holding an artichoke stacked on a couple of gray plates and stole the black and white canisters from my laundry room.
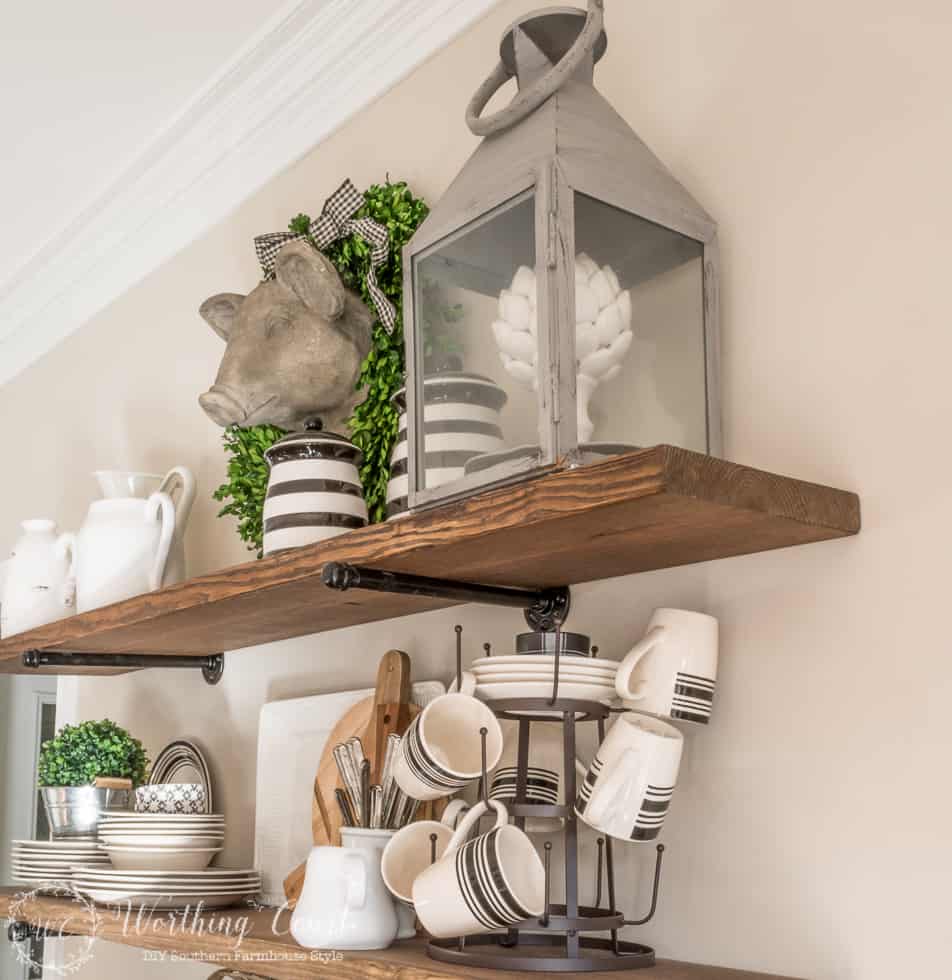
The addition of a faux boxwood orb, a white platter and a faux tobacco basket behind the toolbox completes the look that I’ll keep through the winter.
Oh – I promised a you a before, didn’t I? Here is what the breakfast area looked like on the day that we first looked at the house.
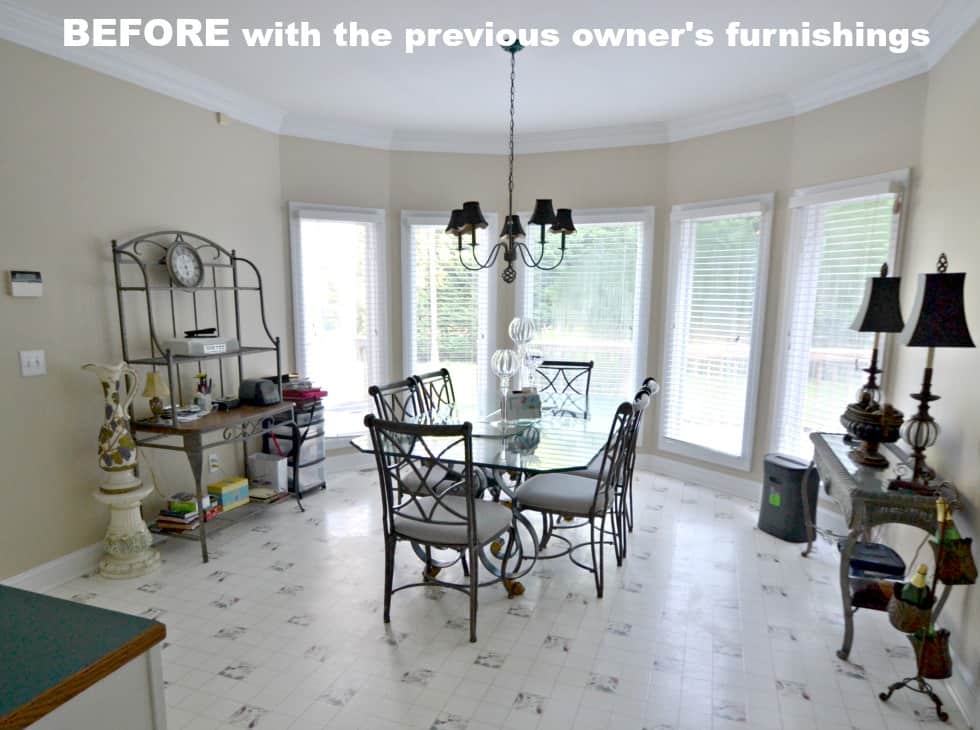
And here she is AFTER. Other than decorating the space, we replaced the vinyl flooring with hardwoods and painted the walls with Sherwin Williams Accessible Beige. Oh, and we replaced all five of the windows in the turret too.
Nowadays, this is my view from my spot on the couch, which I admit, I kind of like.
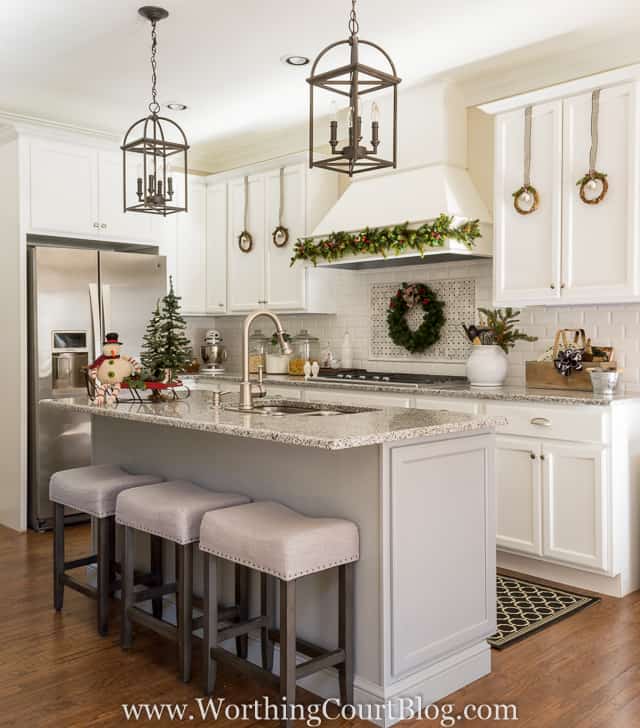
And btw – our breakfast area and kitchen are one long room. The kitchen was a total gut job. Here she is all decked out for Christmas. Click HERE to take the full kitchen tour.
Thank you for stopping by to check out my farmhouse breakfast area makeover today!
SHARING AT THESE GREAT PARTIES!
Such a beautiful home!
This room is so beautiful! I love your style. Would you mind sharing where you found your drapery fabric?
Thank you so much, Rita! I purchased the draperies several years ago from Target. Sadly, they’re no long available. You might be able to find something similar by doing a Google search for ‘medallion fabric’.
Your breakfast area is stunning! The drapes are beautiful. They add such a pretty pop of color. My favorite has to be the bench! Looks so lovely with the big print hanging over it. It was fun to see the before and after shot! What a huge transformation!
Your breakfast area has come so far……great job. Love that light fixture!! Your rustic shelves are a favorite of mine too and hope to make some of my own very soon.
Such a beautiful home. Please come and decorate my house in Michigan. ☺
Love the room! Where did you get your dining table? Thanks!
Hi Jacki. The table came from World Market. I just noticed that it’s on sale right now for a great price! Here’s a link to it: http://fave.co/1LC6ksj
Such a beautiful breakfast room.
Wow! What a transformation! Inspiring! Thank you!
It all has come together & looks so great. I wished I had the view you have. Every things looks so beautiful. Enjoy!
Love, love, love your home!
I love your new light fixture!
The look of your breakfast room is almost ecaxtly what I am planning for our dining room when we redecorate this year. I love how your changes warmed up the space compared to the “before” photo. What a huge difference! Also, thanks for sharing the paint color you used. I am new to your blog and I always wonder about the paint color when I see a room that I like.
What a great makeover. It now is warm and inviting. The before was cold and empty. Your light fixture is perfect for your breakfast area.
You did a fabulous job on your breakfast area!!! Love the before and after pictures.
What a beautiful and inviting area! I always admire your style.
Love the look! Where did you get your kitchen light fixtures??
I love the way that you have decorated your dining room. Thanks also for providing a before picture. It makes it even easier to appreciate all of the changes that you and your husband have made.
Such a warm and inviting space. I love the wood tones.
You have used the available space in a much more inviting fashion – it looks like a totally different space! Love your kitchen!
Lovely space, you did an amazing job. The chandy is spoon worthy for sure.
What an amazing transformation!