Step-By-Step Tutorial For How To Decorate A Christmas Wreath – Directions From A Pro – Part II
Step-by-step directions, tips and secrets from a professional designer for how to decorate a Christmas wreath.
Today we’re going back to the pro, Nancy at Total Bliss, to get into the nitty-gritty, step-by-step directions for how to decorate a Christmas wreath. You may want to read Part I, where I shared basic holiday wreath decorating tips and a few designer secrets, before you proceed with actually putting the wreath together.
I’m going to walk you through making this Christmas wreath, step-by-step today, but these directions can be applied to any style wreath for any season!
Step 1: Choose A Theme, Select A Wreath & Fluff
Before decorating a wreath, it helps to first decide on a theme. It doesn’t matter if you’re using what you already have on hand or are buying all new decorations – having a theme will give you a more cohesive look when your wreath is finished.
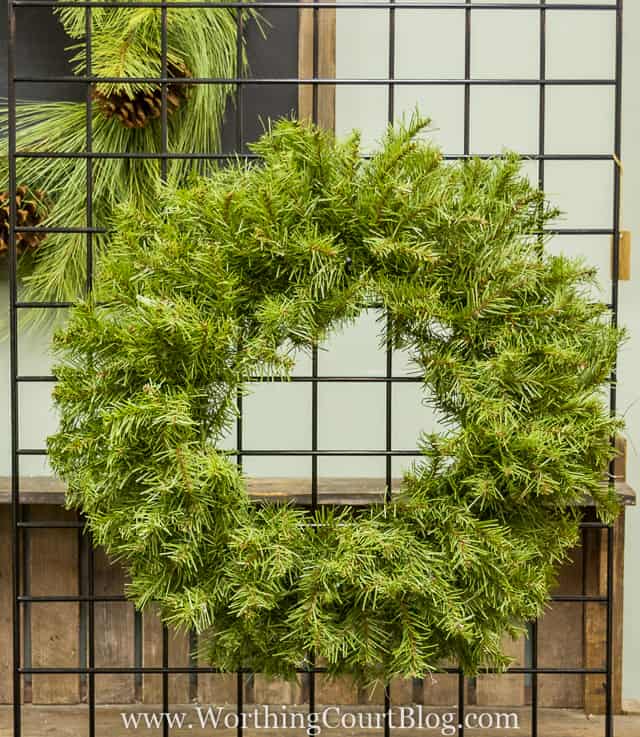
For this Front door Christmas wreath, Nancy used a faux frasier fir wreath. This type of wreath is perfect to decorate because they’re inexpensive and the branches can be bent and used to hold decorations on the wreath. Once you’ve selected your wreath, fluff all of the branches until the wreath is nice and full.
Step 2: Gather Supplies
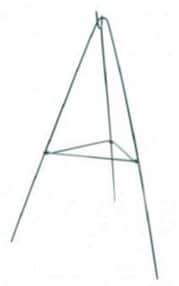
If you don’t have a vertical surface to use when decorating a wreath, I highly recommend that you purchase a wreath stand. They’re very inexpensive and will make decorating a wreath so much easier than trying to decorate it while it’s lying on a flat surface. It’s better to have a wreath stand that is tall enough to sit on the floor, instead of the table. That way the wreath size isn’t limited.
Next, gather all of the decorations that you think you might use on your holiday wreath. You’ll also need cable ties, floral wire, wire cutters, hot glue gun and scissors.
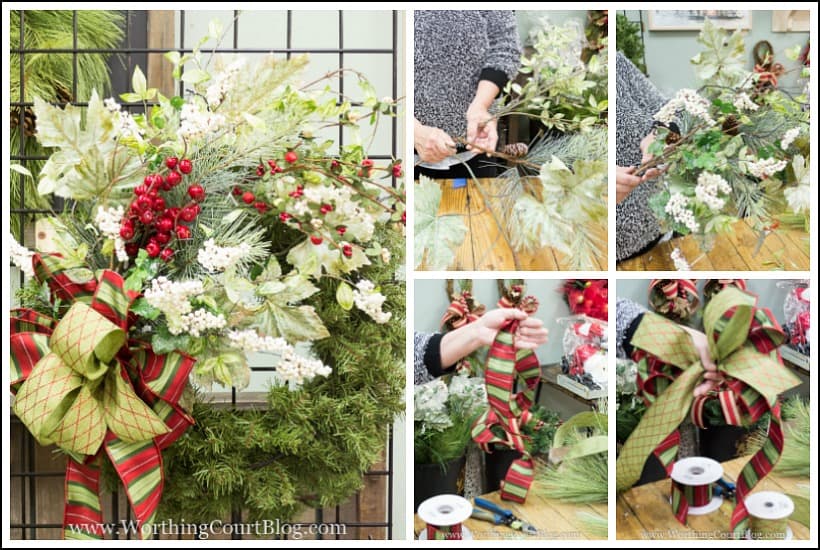
Step 3: Add Floral Stems
Using at least three different types of stems, twist them together, intertwining the pretty flowers and leaves. Kind of like making a bouquet in your hand. After you’ve twisted them together, secure them with a cable tie or two. Don’t just lay the stems on top of the wreath. Instead, work them down into the branches of the wreath and twist the wreath branches around the stems to hold them to the outdoor wreath.
You could attach the stems to the wreath one at a time, but you’ll get a more professional look if you’ll lay the floral stems together, twist the long stems together and fluff the flowers/leaves and intertwine them with one another. The goal is to make them more natural looking.
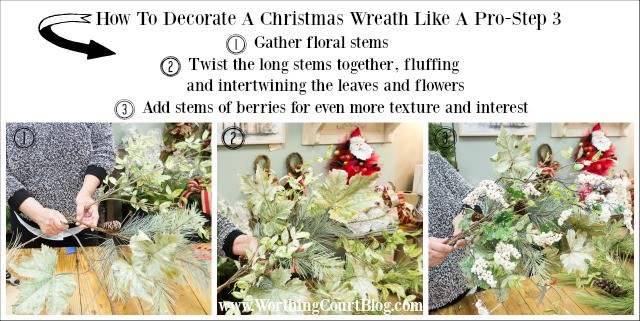
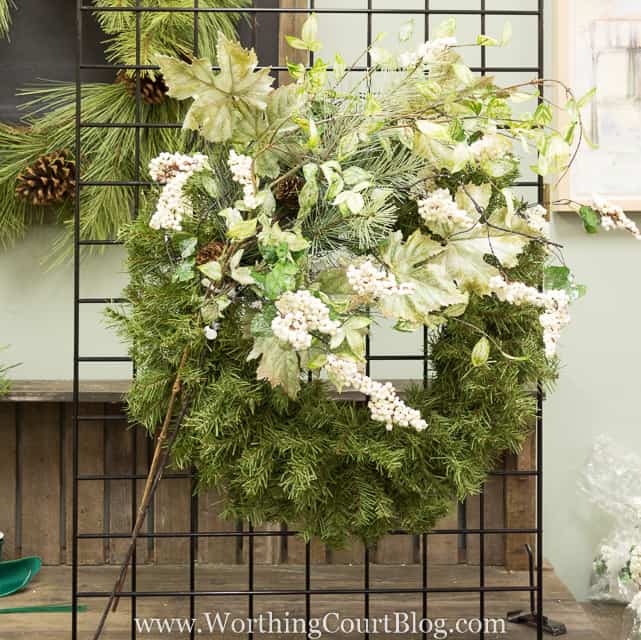
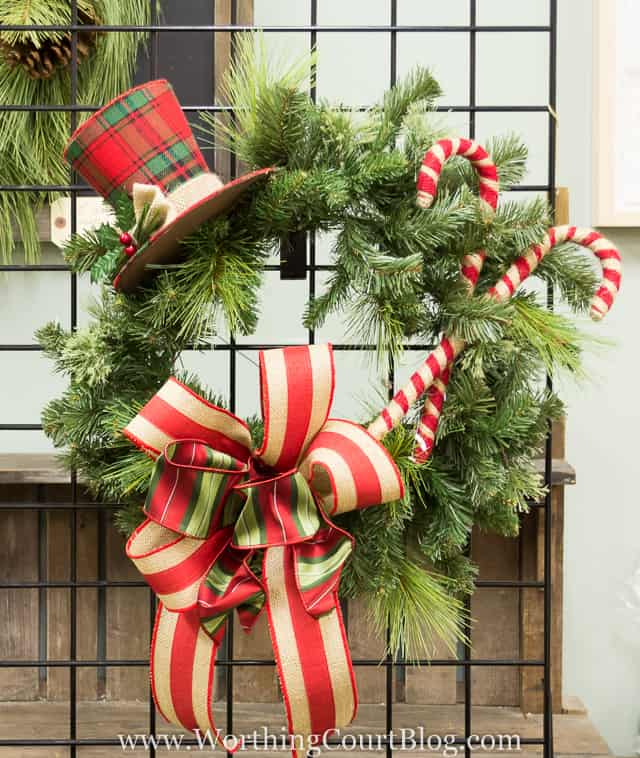
In the above photos, you can see that Nancy started out with three different stems and then decided to add a stem of white berries before she was finished.
In the photo below, see the long ends of the floral stems hanging down from the wreath? Try not to cut them. That way you won’t be limited with what you can do with them if you decide to take the wreath apart and reuse them somewhere else later. Instead, curve the stems around to match the curvature of the wreath and “bury” them into the branches of the wreath. They’ll disappear when you’ve added the rest of the decorations to the wreath.
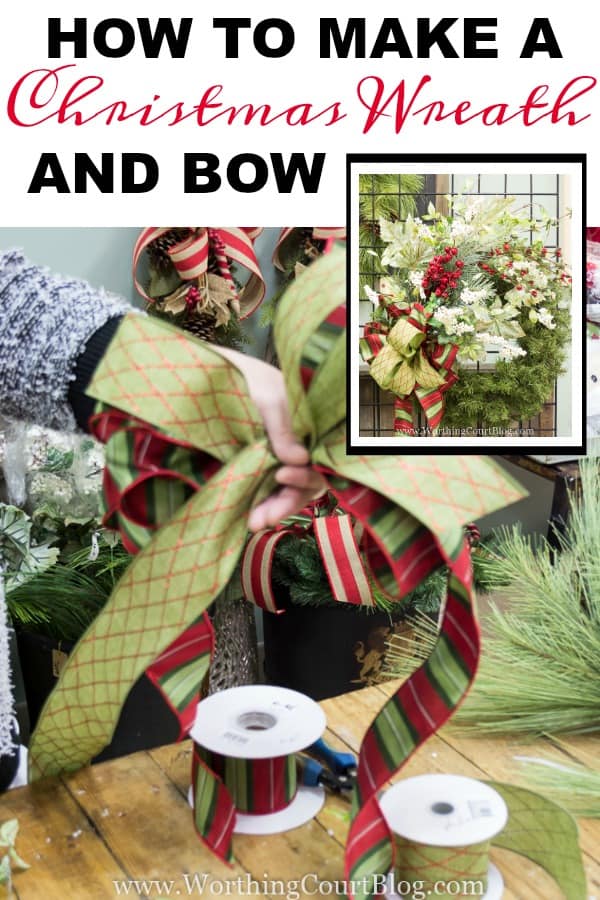
Step 4: Add A Bow
Nancy combined two different holiday ribbons together to make the bow for this wreath and here’s how she did it.
- The finished size of the bow for a wreath this size should measure roughly 10″ wide, from the end of one loop to the end of another.
- Don’t cut the ribbon until you’re finished making the bow. You may use more than you think you will.
- For the first ribbon – start with a 12″ long length of ribbon. This will be a tail of the bow.
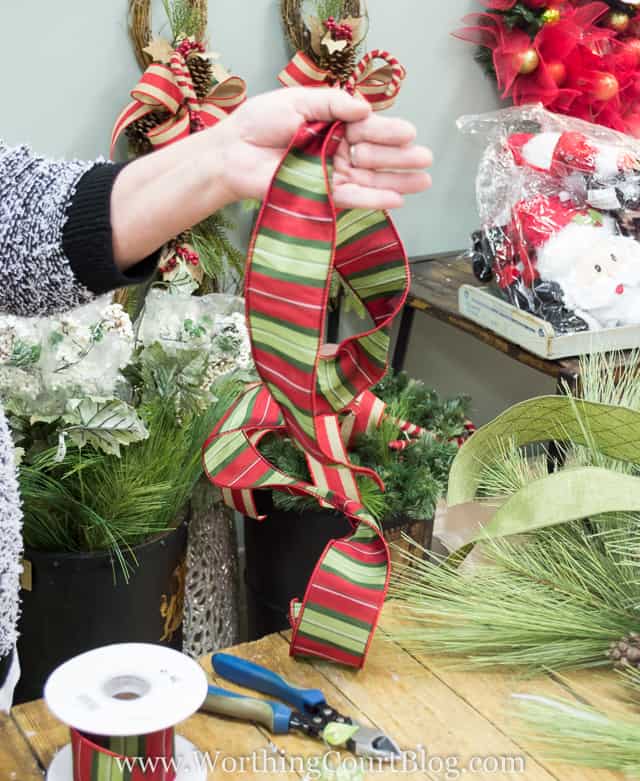
- Twist the ribbon completely over to the other side and make a 5″ long loop.
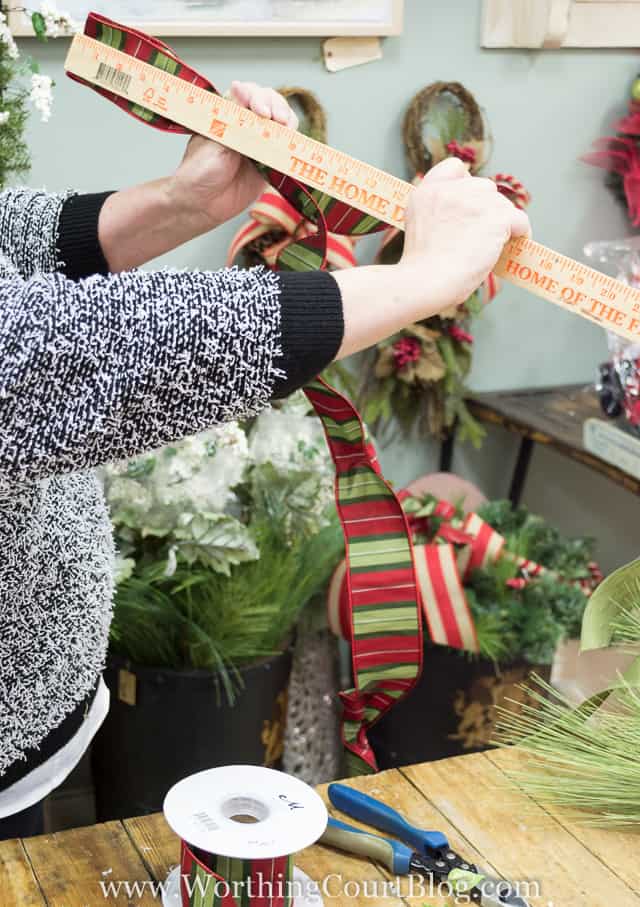
- Make a total of five loops, keeping all of them the same size. Remember to twist the ribbon completely over each time you form a loop. End with another 12″ long tail.
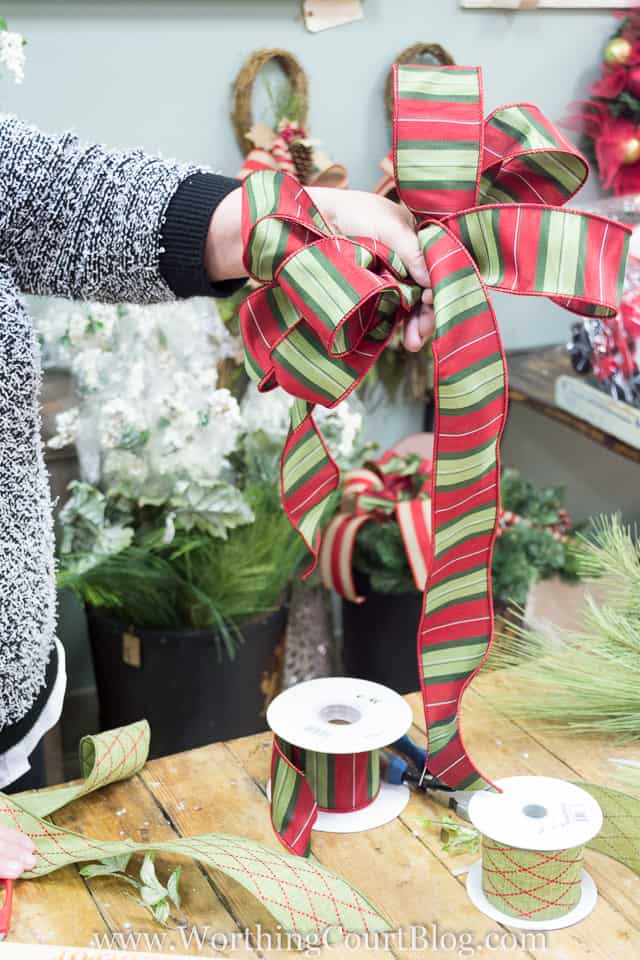
- Start the second ribbon with a shorter tail. Repeat the process to make a total of five loops out of the second ribbon. The tails should only be a few inches long.
- Use a cable tie in the center, pulled very tight, to tie the two bows together.
- Once the two bows are tied together, twist, pull and fluff the loops.
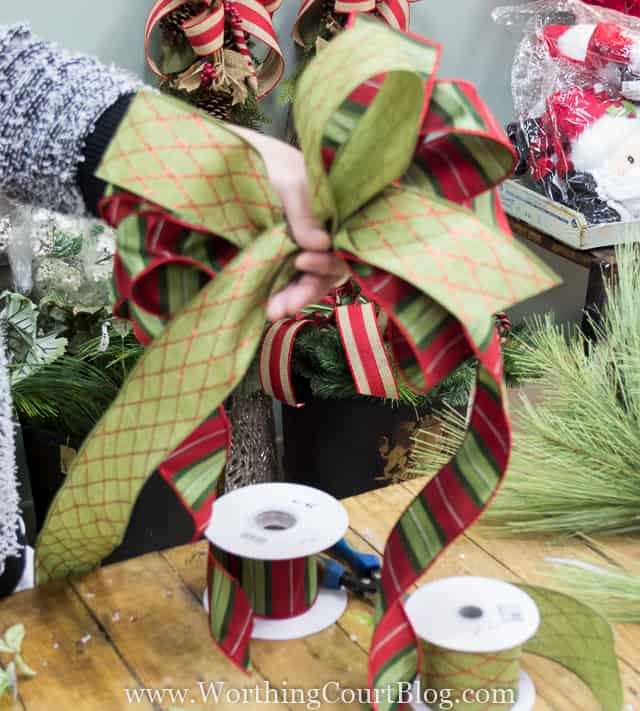
- Pull the bow tightly into the branches of the wreath and attach it to the wreath with floral wire instead of a cable tie.
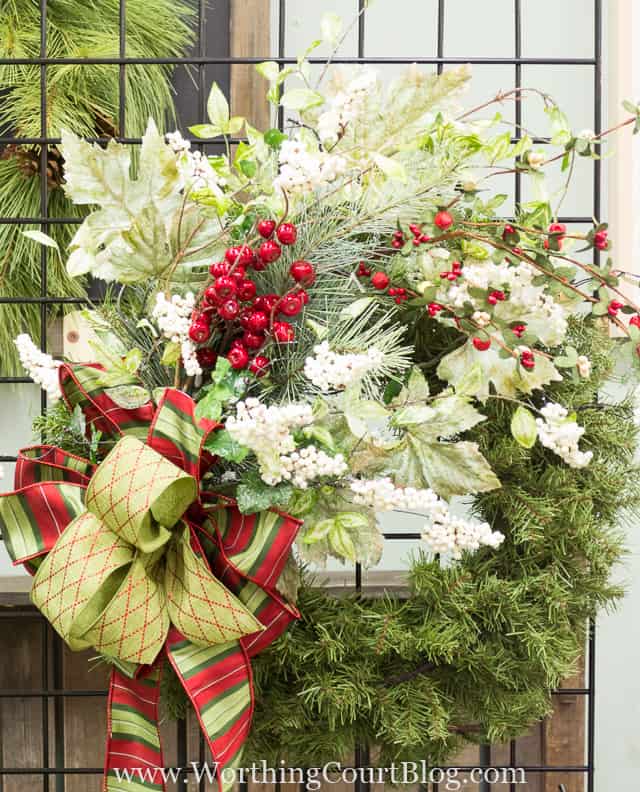
- Fluff and tweak the floral and leaf stems to get a 3D look. You don’t want everything laying flat against the wreath.

Once the bow was attached, Nancy thought it still needed a little something. So she played around with various decorative ornaments and berries, but in the end, she decided that simple is best.
Two stems of different sizes of red berries were simply tucked into the wreath. Here’s the dramatic end result!
Are you still with me? Good for you! Here are a few more tips.
More Tips For Creating Holiday Wreaths
It’s always fun to use an unexpected object on a wreath. In this case, Nancy started with a long needle pine wreath with pinecones already attached. She kept it simple by adding just two berry sprigs and a bow. Two wooden stars were added for something unexpected.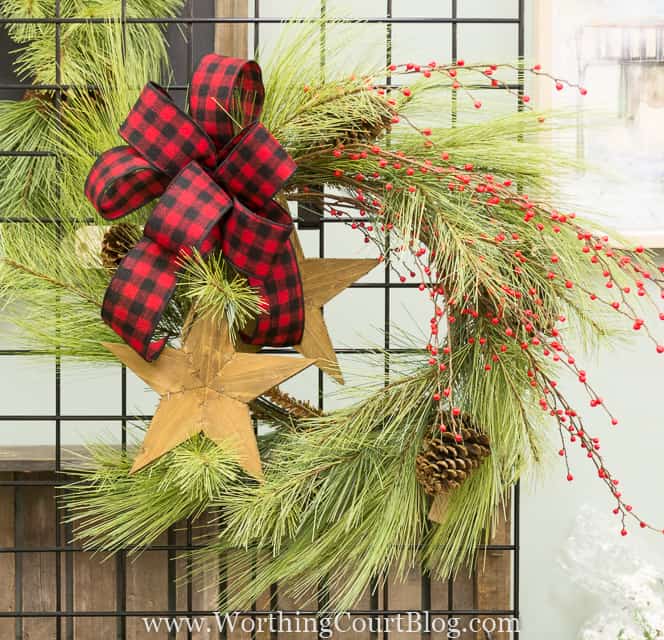
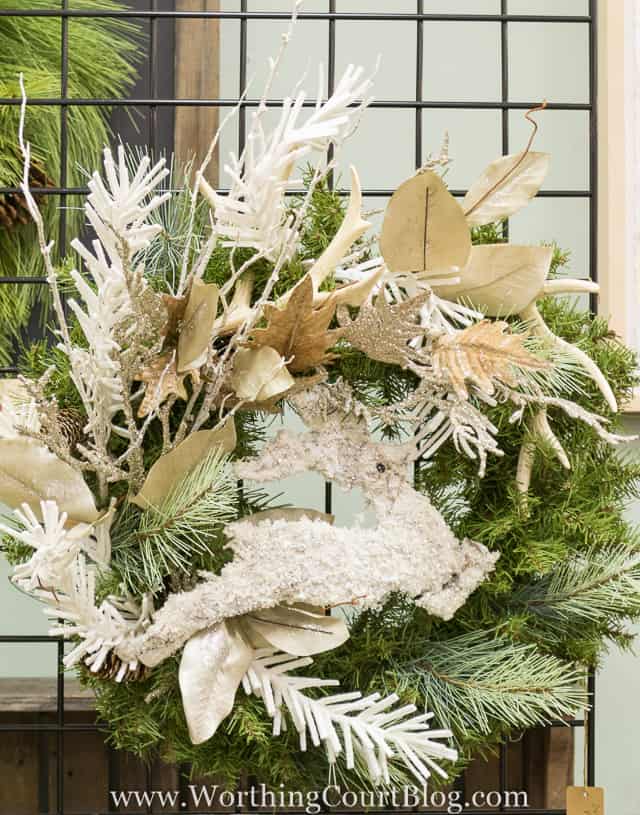
The wreath below didn’t need a bow at all. Nancy used the same “make a bouquet” technique with the stems and attached them to the wreath. The glittery deer Christmas tree ornament takes center stage. Don’t think that you have to use floral stems just like they are. You can pull them apart to make them go farther. In this case, the white spriggy things were originally all on one pick, but Nancy pulled them apart and spread them around.
So, the moral of the story is – let your imagination run wild when designing a Christmas wreath. Follow these simple steps and you’ll always have a professional looking wreath!

__________________________________________________
Did you find these tips and directions helpful? I spent time with these same ladies learning all the steps and secrets for decorating a Christmas tree too!
Step-By-Step Christmas Tree Decorating Directions And Secrets From The Pros
Super tips Suzy an I think the tip of the wreath stand is perfection. Silly, I didn’t every know there was such a thing. Love that plaid top hat. Stop wing it, it’s killing me, I want that, LOL. PINNING
Cindy
Hi Cindy. I know – isn’t that plaid top hat the cutest thing?!?! Hope you’re doing well!
What an absolutely gorgeous tutorial! Thank you so much for sharing it, Suzy, and for hosting this week! Pinning!
So glad you like the tutorial. Hope you were able to get some tips!
Great tutorial! I think I can make bow’s now…here’s hoping!
Hi Donnamae. Trust me, these ladies whip the bows out in nothing flat. And they’re always gorgeous. Me – not so much. lol It takes a lot of practice and patience.
Hi Love the tutorial. Just need clarification on cable wire. I think I know what it is. If you can describe it or a picture of one that would help. Thanks for your help.
Hi Irene. I’m glad you like the tutorial. Here’s a link to cable ties with a picture: http://www.lowes.com/pd_292680-47120-SGY-CT6___?productId=50005756&pl=1&Ntt=cable+tie
That’s what I thought they were. I ordered a wreath stand from amazon too. Thanks again
You’re very welcome! Happy wreath making.
Suzy, Thank you so much for sharing this tutorial. I really enjoyed seeing it and will be pinning for later. I enjoy your posts so much. Going to look for materials for the plaid top hat. Wish me luck.
I just love the top hat! Just want to thank you for your wonderful ideas & step by step instructions. They are so helpful. I find the hardest step is just figuring out which ideas to choice. Good thing I have a big house.
Very pretty wreaths and I will definitely pin this one. Thanks.
Nancy is the Wonder Woman of Christmas! Thanks for revealing her techniques. Her bows are always unique and her wreathes are whimsical and beautiful!
Thanks for sharing this tutorial! I have several wreaths that I was going to get rid of, but now I’m going to try this! And I love the directions for making the bows!
Absolutely beautiful. These were great tips & I thank you so much for sharing. Love Love Love that top hat!!! I might be able to make that one if I have someone make the bow for me. lol. I so enjoy your blogs. Thank you very much!!
I have been making wreaths for a long time. This is a great tutorial. I use pipe cleaners for my bows and ties.
Seems we all love the top hat. You should be selling them.
Great tutorial. I’ve been playing around making my own wreaths for years, not really knowing what I was doing. Thanks for all the good tips – the wreath stand is new to me, also like the idea of making a bouquet – will try that out next time. I am a little confused about the 5 loops for bows. Looks like an even 6 to me for the first ribbon and then not so many used in the second ribbon. Can anyone explain this better to me?
Hi Linda. You’re right, that in the in-process photos, the number of loops is different, but that’s because Nancy was showing the loop making process while I was taking photos. I asked her what a general rule of thumb was for the number of loops when others are making bows and that’s where my numbers came from. The whole idea is to get a nine or ten loops in total, whether using one ribbon, two ribbons or more. Sorry it was confusing!
So glad you provided tips from a pro decorating a wreath. Always love a DIY project!
Thanks for the tutorial! Total Bliss is my favorite stop in Greensboro. Nancy’s wreaths are always beautiful, with original accents and gorgeous ribbon. My bows are never quite as pretty as hers.
I think I might need an in person lesson on the bow making…