How To Paint Furniture For A Farmhouse, French Country, Cottage Or Shabby Chic Look
I am sharing with you the best way to paint furniture for a farmhouse, French Country rustic look!
Step-by-step directions for how to paint your dark and dated furniture for a Fixer Upper style, farmhouse, French country, cottage or shabby chic look.
Affiliate links have been used for some items, which allows me to make a small commission from your purchase, but at no additional cost to you. See my full disclosure HERE.
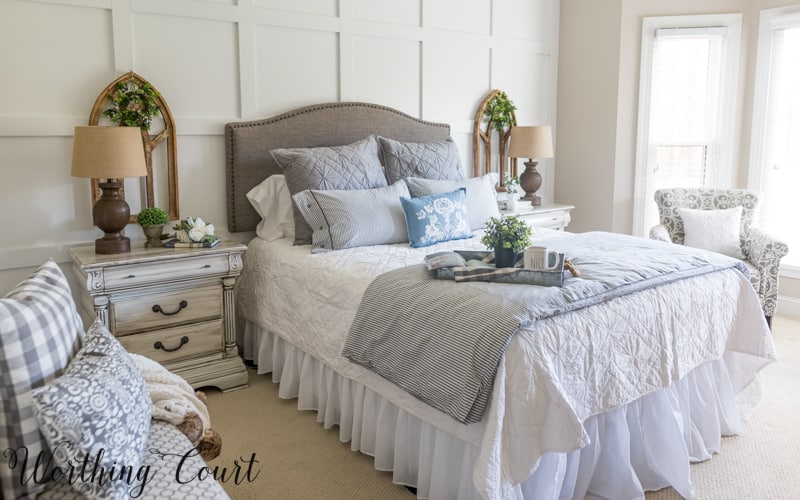
If you caught my guest bedroom makeover update a few days ago (you can read that post HERE), then you’ve already had a peek at the makeover that I gave to my fake cherry finish furniture with paint.
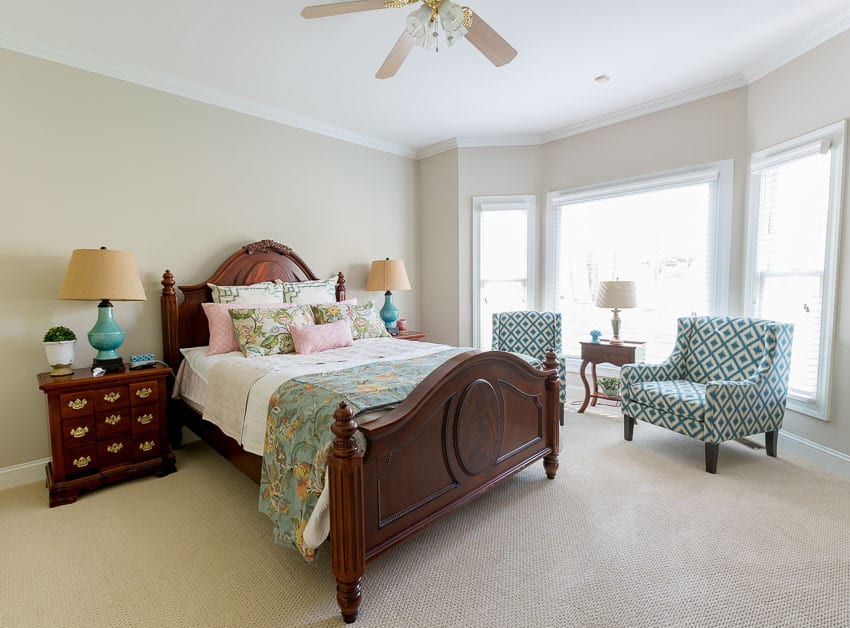
Below, you’ll find my step-by-step video and the products and colors that I used, but first let’s take a look at the beginning. This is what the room and my dated furniture looked like before I started. When we moved into this house, three years ago, I brought the bedroom furniture that I already owned with me and placed it in our guestroom. The room stayed this way until I finally got around to giving it its makeover.
I created a mood board for the room, to help me get started (you can see the mood board HERE), but I started second guessing myself when it was time to actually get started. I even went live on Facebook asking for your opinions about how I should paint my furniture. Y’all were awesome and gave me SO many wonderful suggestions for what to do! Some of you even sent me pictures of great ideas that you had, which was really helpful and actually sparked the idea for what I wound up doing to my furniture.
The nightstands that were originally in the guest bedroom are not the ones that actually go with this furniture, so I swapped them out and brought ones that matched back in. I originally planned to keep the bed, but in the end I decided that it was just too bulky and took up too much space in the room, even though you really can’t tell that in the before photo. Plus – I didn’t want every single piece of furniture to be painted.
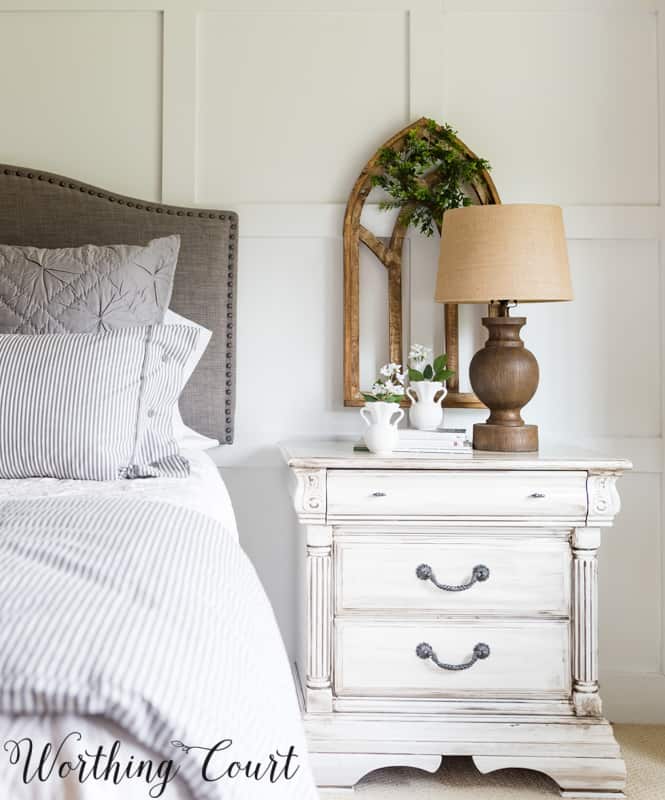
Unfortunately, I don’t have a before photo of the nightstands, but they were the same fake cherry finish as the ones in the before picture above. You can see what they originally looked like in the video below. And here’s what they look like today!
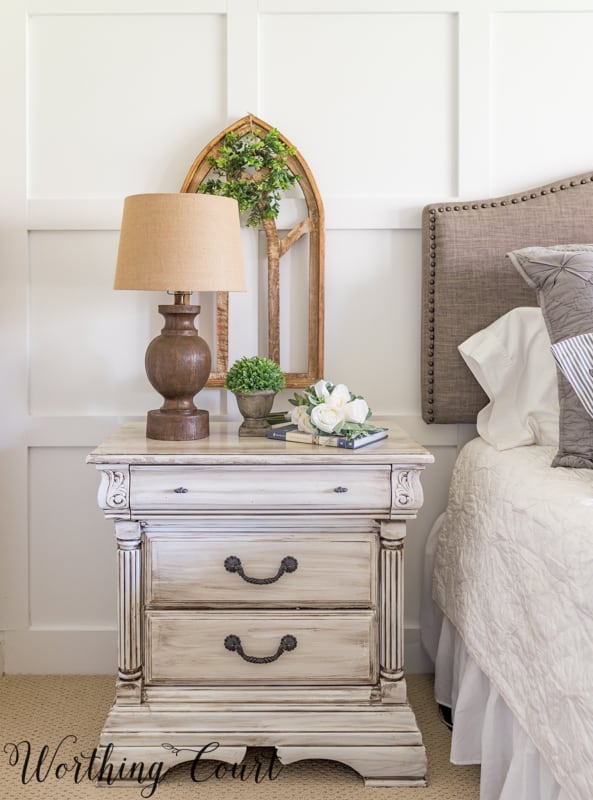
I love the beautiful white washed rustic look!
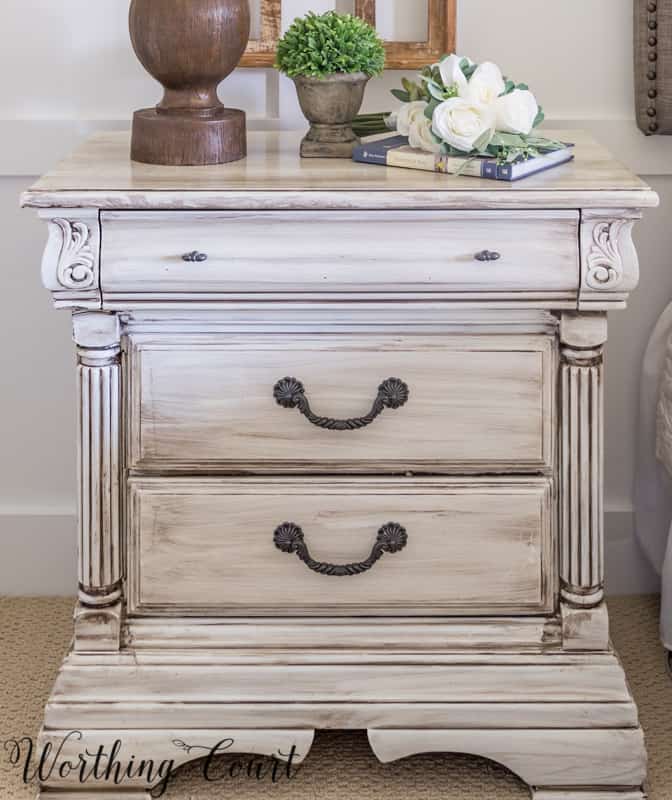
I’m so, so in love with how they turned out and I have all of you to thank for sparking my creative juices and helping me decide what to do! I painted both nightstands the same and will be painting the dresser and mirror using the same technique.
This is a very forgiving paint technique, so painting these was super simple! I always get a ton of questions whenever I paint furniture, so I made a little video showing you exactly how I achieved this look. You can watch the video HERE.
PRODUCTS USED:
Sherwin Williams Duration Paint in two colors:
- Extra White
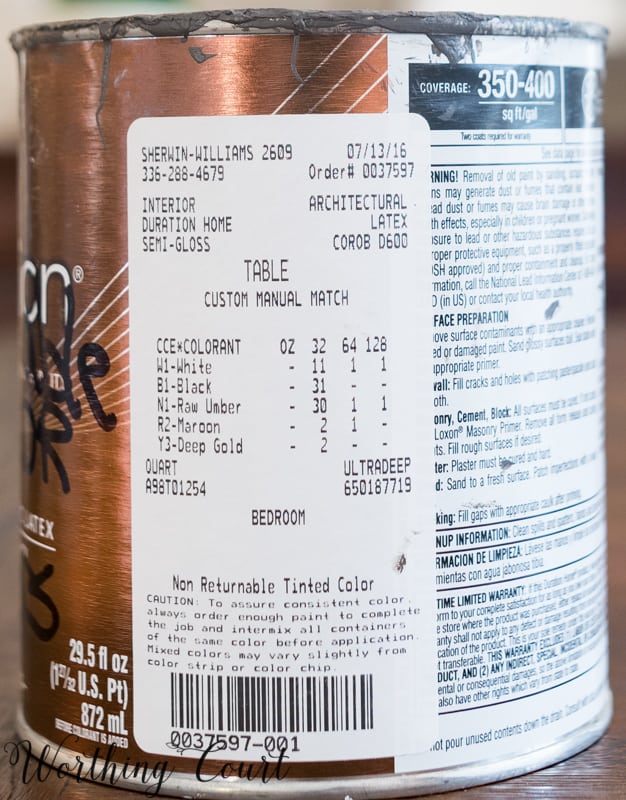
- A Custom Mix. The exact formula is in the photo below.
Hardware Paint: Rustoleum Soft Iron Metallic Spray Paint
Pre Paint Prep: Krud Kutter Gloss Off
Paint Brushes: These Purdy brushes are my favorite.
Paint Roller Frame: This Purdy roller frame worked like a charm and didn’t clog or smear the paint!
Paint Rollers: These Purdy rollers are made especially to fit the above roller form.
Paint Pail with Handle: This paint pail is so handy and sure beats carrying around a whole can of paint.
Paint Pail Liners: I always keep a good supply of these disposable liners handy.
Painting Gloves: Non-Latex gloves for keeping your skin free from paint.
Here is the custom paint formula that I used for the “glaze” on this furniture and also used to paint the furniture in my dining room.
Happy painting, my friends!
I love the the new look. I especially love the wall behind the bed. It really adds to the room. I hope your guest enjoy their stay. Thanks for sharing.
Your nightstands look great – what a difference! Thank you so much for sharing how to achieve this look. Love it!
Very pretty. Thanks for he tips.
A tip for videoing …..always hold your camera horizontal. No matter what. It gives a bigger viewing area because it takes the “black” from the sides. Try it you’ll see what I mean. ?
Thanks, Nancy. I figured out that I should have done that once I started editing the video! 😀
I love what you’ve done with your nightstands. The look is so different than the original and they compliment your new bedding perfectly! Great job!!
Awesome tips, I love that look and how it can blend in to create so many different styles!
I love the church windows behind the beautiful nightstands. Can you tell me where you purchased them? I room looks amazing! Great job.
Hi Donna. I found them at a local home decor shop.
Oh my goodness!! They are gorgeous! Absolutely gorgeous. I’m such a naive newbie whe6 it comes to anything DIY like this. . I wish I had you here by my side to help me through the process! It’s EXACTLY what I want to do to my nightstands AND to sooooo many pieces of furniture in my home…..TOO many?. I just need to START somewhere, I guess. The entire room looks so cozy and inviting. Such a nice job….?. Btw, have you ever worked with the Annie Sloan chalk paint?? I’ve heard SO much about that lately and it also looks very beautiful. Thank you!
Hi Kimberly. Yes, I’ve used Annie Sloan several times. What I love about it is that there’s virtually no prep work prior to painting and it covers very well – sometimes I only need one coat of paint. What I don’t love about it, is that you don’t get as smooth of a finish as you get with regular ole latex paint. The other downside (to me anyway), is that you have to finish it off by either waxing the piece (which is labor intensive) or by applying poly. If you don’t, the finish feels kind of dry and rough. Hope that makes sense!
Great post with so much information. Now I really want to paint a piece of furniture in my home! Thanks!
So happy you found this helpful, Debbie. Happy painting!
Wow!!! Beautiful!!!!! I am just starting to refinish for my granddaughter on the way!!! This is just perfect for her room!!! So much info in this video! I am so thankful I found this!!!! You have amazing talent! I will send photos of my finished room!
Thank you, Christina! I can’t wait to see the pictures! Shoot me an email if you have any questions.
I like this look but also liked the way you painted dining room furniture gray. Do you have the products and steps for that as well. Maybe it was in an earlier blog.
Hi Tammy. Here’s the link about painting my dining room furniture: https://www.worthingcourtblog.com/how-to-paint-wood-furniture/
Hi Suzy – In your video you show that you used Klean-Strip liquid sander deglosser, but in your links to all the supplies you used, you recommend Krud Kutter on Amazon. Which one do you prefer? Thanks for your reply.
Hi Donna. I think they both work the same. Klean-Strip just happened to be what I already had on hand. 😀
Ok, thank you! Yours turned out so pretty, I thought I I would try it on my guest room furniture. I was putting it off because I was dreading the sanding so I’m so glad you posted this! I had no idea there was any other way. I really enjoy your email newsletters and your blog.
Thanks for the tips! Krud Kutter really helps
Suzy, thank you so much for this video and blog post. The nightstands turned out beautiful! I painted my bathroom vanity with Annie Sloan paint and then used a dark wax and I am not happy at all. I think I am going to redo them using this technique!
Thanks again for sharing!
Cleta
Have you ever painted the dark shiny furniture a light brown then put the dark stain on it? I just don’t want white or farmhouse or French country in my master bedroom. I have dark mahogany glossy furniture with bed posts on my bed. Really I just want to get the gloss off. Thanks!
The only other color that I’ve painted furniture, besides white, is gray or blue. Painting it brown would be just like painting it any other color – it just won’t look like wood anymore. 😀
Hi Suzy, love your blog by the way. Always on it and reading new things you do. I have a question about a couple of end tables that I am trying to match to a weathered bed I purchased and 20 times painting them, I’m so irritated with it. May I send pictures of the bed and the end table I am trying to match?
Hi Carie. I just responded to your email, but I’m not sure that I answered your question properly. I assumed you were asking about colors for bedding, but now I’m wondering if you’re asking what color to paint your end tables???
Looks great! Such a huge improvement.
When I paint over dark or cherry wood, I use a shellac-based primer so there isn’t any bleed-through. Will the white paint you used first accomplish the same thing?
Not using primer worked for me, but I believe I could have done fewer coats of regular paint if I had primed first. 😀
I loved your video on your small dressers in your guest room. You made it look pretty easy, although I’m sure it wasn’t.
I’m glad you enjoyed the video. This looks easy because it really is! It’s a very forgiving paint technique. If you’ve never tried anything like this before, I suggest experimenting on some wood scraps or smaller pieces of furniture until you get comfortable with it. 😀
Hi just saw this awesome idea! I just need to know, what kind of white?, eggshell, satin, gloss? Can’t wait to try this!! Thanks
I used semi-gloss/satin, but it really doesn’t matter as long as you’re going to finish the piece with a clear sealer like polyurethane. The finish that you choose for that will dictate the final sheen. I typically use a satin finish for the poly, btw.
I beg to differ. I used paint that turned to chalk board like finish. Didn’t work to wipe off next application…. Should’ve known better really.
I’m not sure exactly what you mean, but I’ve used clear sealer on all types of paint, including chalk paint and have never had a problem at all.
Love it! So you don’t have to sand at all, is that right?
Hi Kerry. Yes, using this type of paint from Sherwin Williams and making sure to wipe down the surface really well with a deglosser/liquid sandpaper means no need to sand. 🙂
I am so glad I found your blog via PInterest! I just chalk-painted my first piece of furniture (a Stanley dining room hutch) by using “good ole Latex” paint mixed with BB Frosch transformer to make chalk paint, but now I am BLOWN away by the concept that I can actually use the wall paint minus the chalk paint additive to paint my circa 1990’s furniture that is in bad need of updating. Plus, you just can’t find good furniture like that nowadays. Thanks for much for the informative post and insight, I am going to use your photos & video instruction for my inspiration for redoing my bedroom asap!
I’m so glad you found this helpful. Thank you for letting me know!