Master Bathroom Makeover Progress – The Vanity Area, New Lighting, New Mirrors And Accessories!
See how I turned my outdated master bathroom into a beautiful modern space!
An in-progress report on turning a dated master bathroom into a modern traditional updated space with new lighting, mirrors, new hardware and accessories.
After doing the major renovation in our bathroom almost six years ago, it’s finally time to put the finishing touches on this bathroom space! You can read all about the renovations that we’ve already made in this room HERE.
My goal is to turn our very dated, mid-nineties bathroom into a fresh, bright and more modern traditional room where we don’t mind getting ourselves ready every day. How we stuck it out with it looking only halfway done for so long, I’ll never understand.
Let me remind you of what the vanity area looked like on the day that we first toured the house.
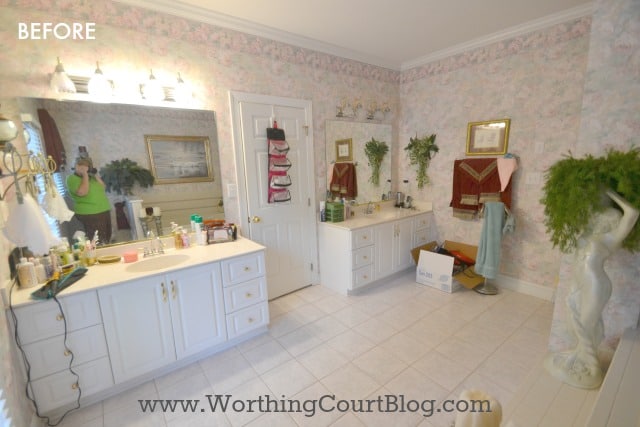
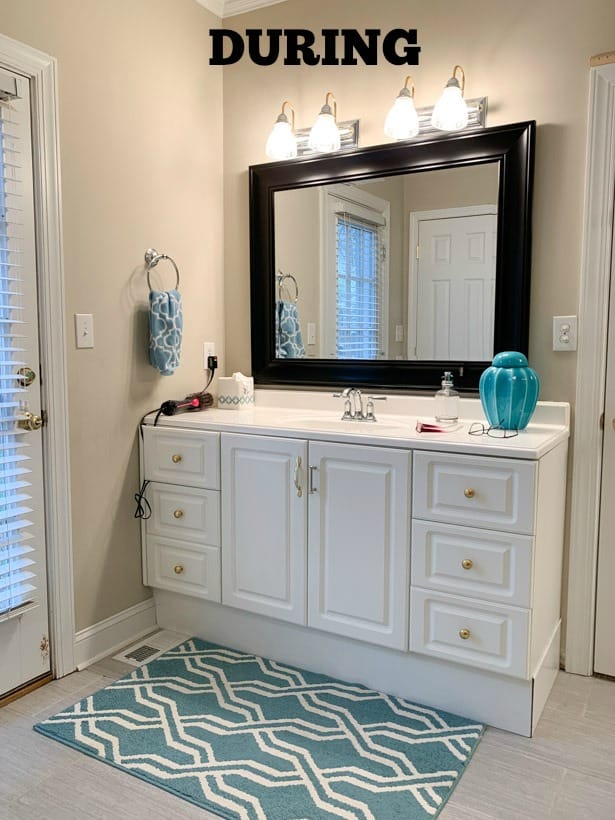
And this is what both vanities have looked like for the last few years, ever since the major renovations took place when we first bought the house.
We did just enough to make the bathroom serviceable until we could complete the renovation project, but there was certainly no pleasure in using this half-done space every day.
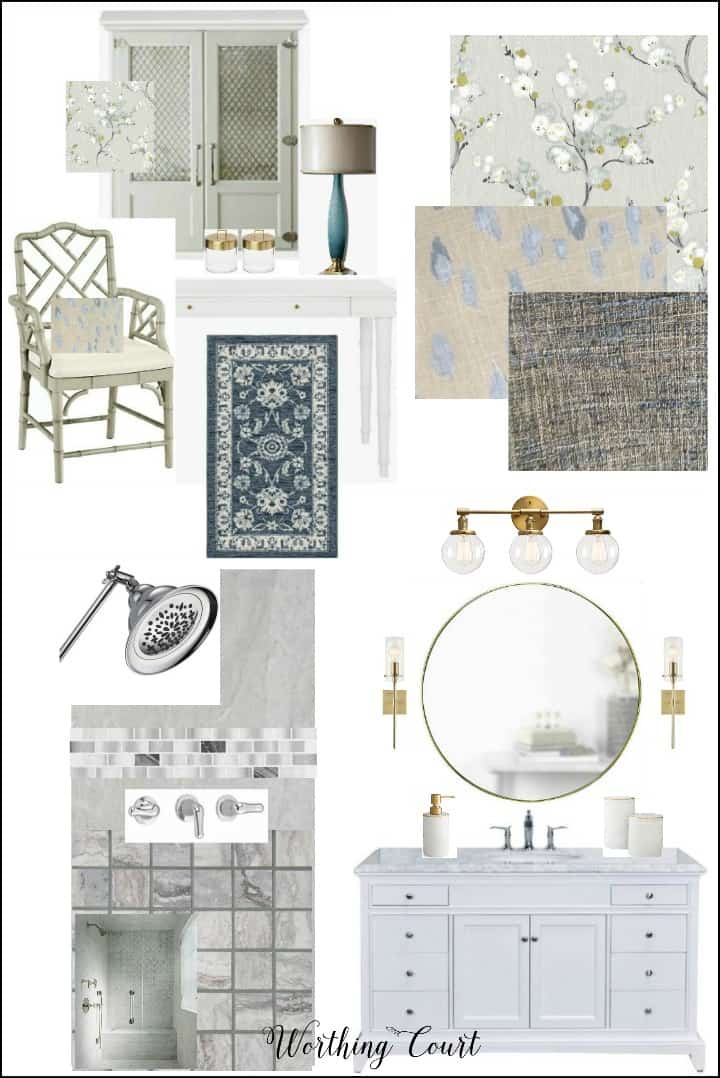
Before I show you all of updates, let me show you the design board that I’ve been working from. Using a design board is SO helpful when it comes to decorating a room and they’re fun to make too!

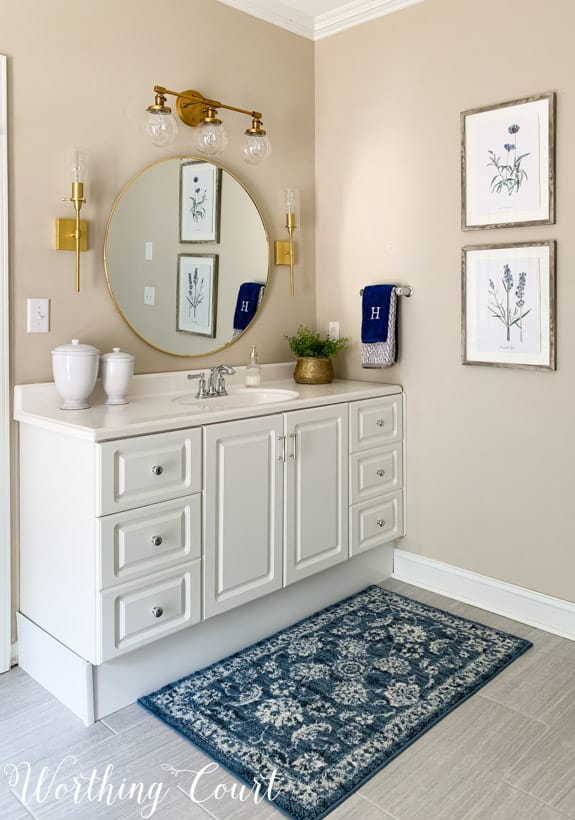
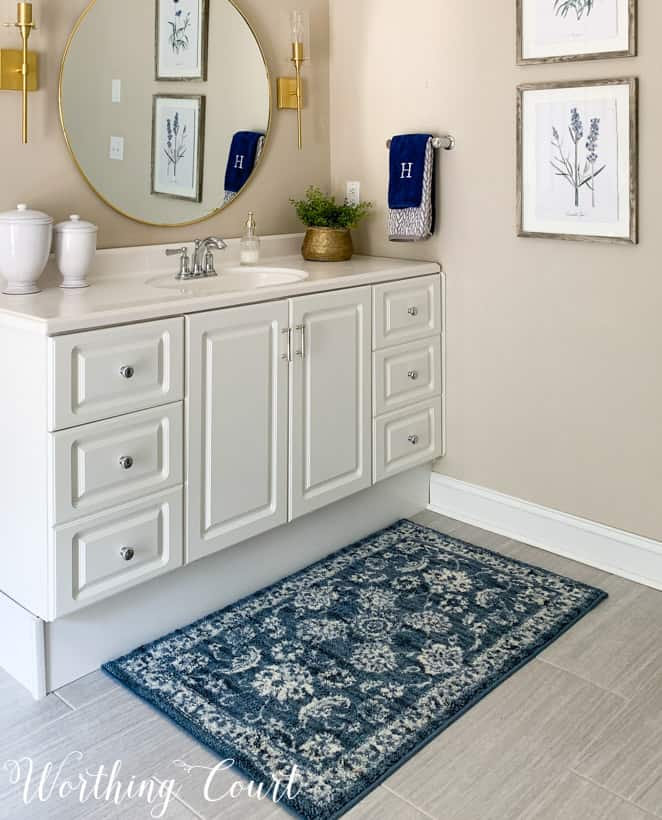
THE VANITIES
We’ve gone back and forth about replacing these bathroom vanities multiple times. Yes, they are 25 years old, but there really isn’t anything wrong with them and I think the style is in keeping with the modern traditional style that I love using in my home.
If we had replaced them, I would have chosen vanities that look virtually the same as these. So in the end, we made the decision to keep them, build a base for them that would raise them to comfort height and just replace the counter tops and faucets.
We still need to trim out the skirt around the bottom, but I have a plan for that.
UPDATE: We’ve decided that the vanities need to be replaced after all, so I’ll be on the hunt for two new ones!
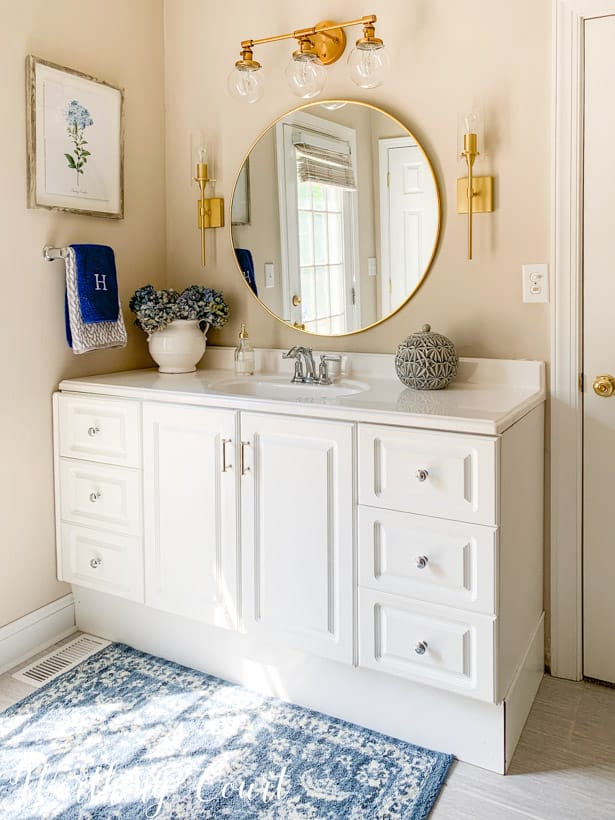
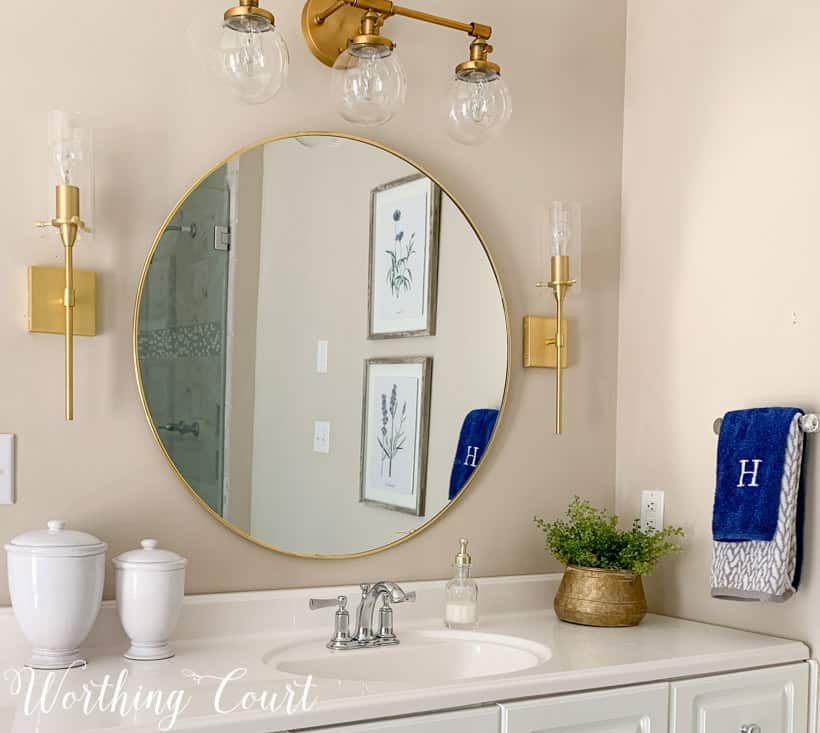
THE LIGHTING
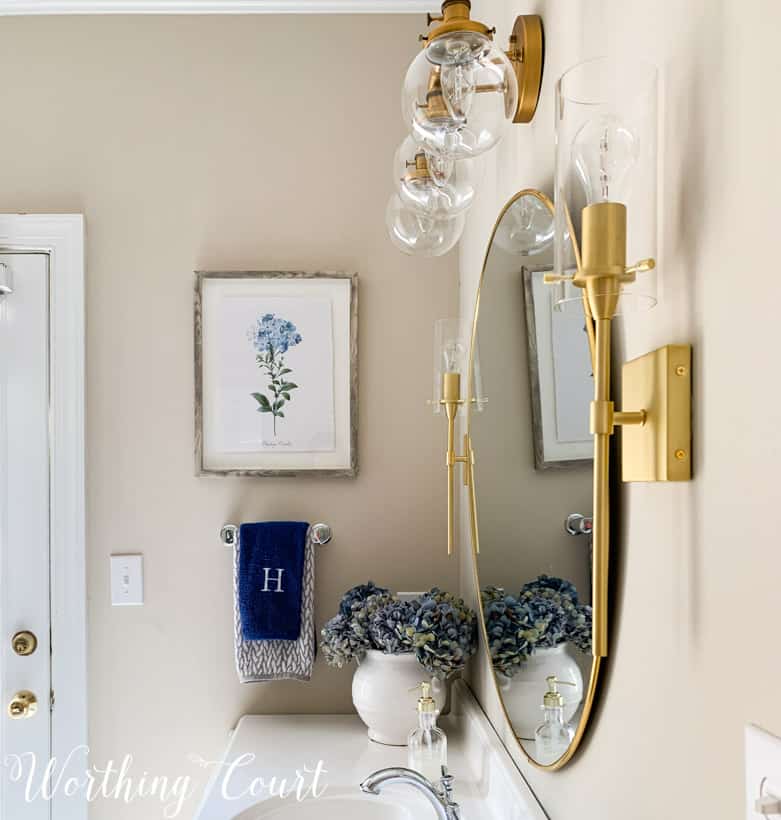
Staying true to my budget-minded personality, I was perfectly willing to spray paint the existing light fixtures, change out the glass globes and reuse them. There were two fixtures hanging above each sink, so I would have reduced it to one for each sink and still have added sconces to each side of the mirror though.
But, it turned out that some of the light bulb sockets were so loose that we had difficulty changing the bulbs. That probably could have been fixed, but upon closer inspection, we discovered that there were some serious pock marks in the finish that I couldn’t possibly get rid of. Enter these gorgeous beauties!
I’m a form over function kind of gal most of the time, but I do try to be practical too. So I made sure that the upright shade on the sconces that I chose was open on the bottom, so that the light fixture wouldn’t fill with flying hair or whiskers. It is a bathroom after all!
So, even though I did spend money on new modern lighting, I chose the most budget friendly options that I could find that I also liked.
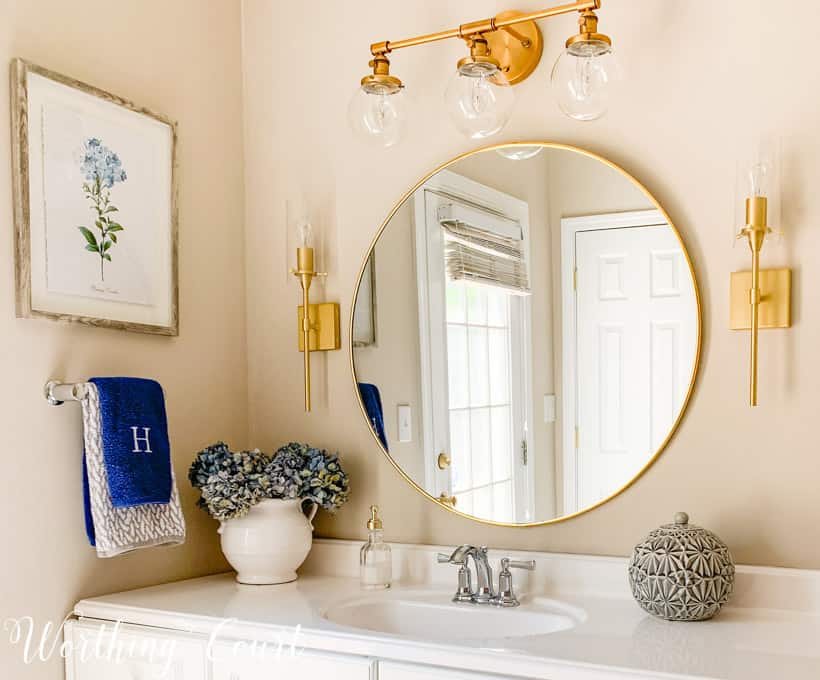
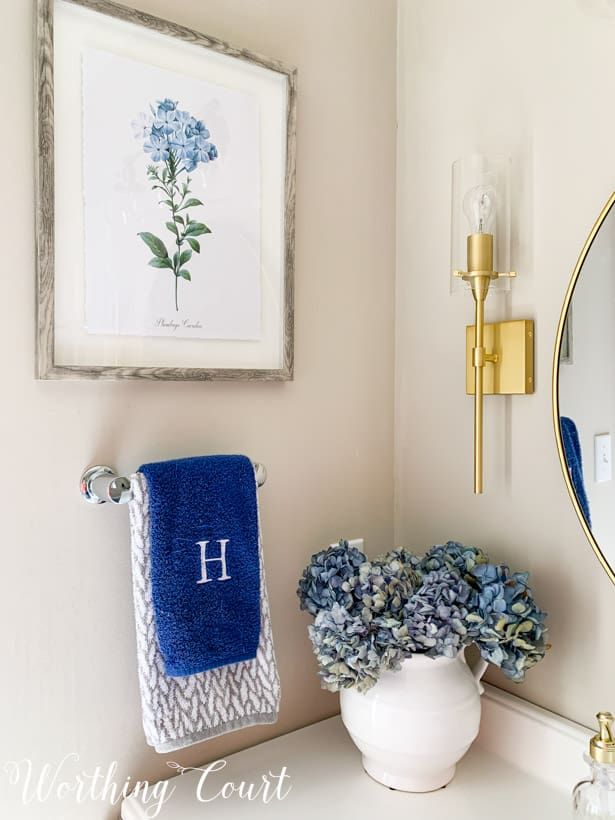
THE MIRRORS
We removed the original huge plate glass mirrors that were above the bathroom sinks and found the least expensive ones that we could to act as place holders until we got around to finishing the bathroom.
The new round mirrors have taken some getting used to, but I love how they break up all of the squares in the room. Plus, the simple frame is much more updated looking than the heavily framed mirrors that I had before.
THE WALLS
The walls in this room had me in a little bit of a quandary. There isn’t a good spot for hanging towel bars (we wound up hanging them on the back of the door), which usually take up some of the wall space in a bathroom, but there was too much empty space to leave the walls blank. Plus, the amount of wall space on each side of the room is different, so there wasn’t anyway to do matching art on each side.
My solution was to purchase a set of three coordinating framed botanical prints and break them up. Two of them hang on the wall on my husband’s side of the room, right outside of the shower door.
On my side of the room, we replaced the towel ring with a 9″ towel bar, lowered it and hung the third print above it.
THE FLOORS
And finally, the floors. I originally thought that I would use a more turquoise’ish blue when I decorated this bathroom, so the mats that I purchased several years ago were in that color. However, when I started my master bedroom makeover, I gravitated to shades of chambray blue with gray tones in it.
I would love to have some gorgeous matching area rugs in the bathroom, but practicality won the day again! Let’s face it, things like makeup, lotion, etc. are frequently dropped/spilled in a bathroom, so having rugs that had to be professionally cleaned wasn’t a practical option at all.
I wanted actual bath mats, with a rubber backing, that I could throw into the washing machine on occasion, but I despaired of ever finding any that would give me the look of an actual area rug and not a typical bath mat.
I felt so fortunate to find these! They’re the type of design that I wanted, the color that I wanted and I could get all three rugs (I needed two for the vanities and a small one for in front of the shower) in the sizes that I needed.
That’s it for this side of the room! I’m totally amazed at how making just these few changes has so changed this half completed master bathroom of ours!
Now on to finish everything else on our to-do list!
Here’s how the list is looking today:
-
change mirrors above the vanitiesadd a new light fixture above each mirror and add sconces to each side of the mirrorschange the hardware on each vanity- re-do the skirting around the base of the vanities
- caulk where the new baseboards were added after the floor was re-tiled
build a new cabinet to go above the makeup table- wallpaper the back of the new cabinet and decorate the interior
- repaint the vanity table
- replace or paint the lamps on the makeup table
- replace the current chair I’m using at the makeup table with something fun
replace the bath mats- gussy up the potty room
- make window treatments
- accessorize!
This turned out great ! Would love to know how far you raised your counters as I need to do this in the guest bathroom. And when you did it was it much of a pain to change the plumbing below to accommodate the new height of the cabinet?
We raised both vanities 8″. My husband is 6’2″ and I’m 5’8″ for reference. We had our plumber reconnect the sinks, but I don’t believe it was a problem at all. I guess he simply used longer water lines and pvc pipes.
It looks just beautiful! Reward for all your hard work 🙂
Can you tell me the paint color and brand you used in this room?
Thank you! The wall color is Sherwin Williams Accessible Beige.
It really looks lovely. Everything you have chosen looks so nice in the space. However, in real life, I would have major problems poking through plants and flowers to get to the electric outlets! Love the looks of the styling and would love to have something like this myself, but where do people keep their electric toothbrushes and waterpiks??
Thank you! The vanities are definitely styled for photographing for the blog. In real live we do not have plants in front of the outlets, my hair dryer is out on my vanity and my husband’s razor is out on his. If I used a waterpik or electric toothbrush, those items would be out as well. 😀
Oh, thank you for telling me! I have been feeling bad this week looking at the “stuff” we leave out because we use it daily or multiple times a day — those electric toothbrushes, etc. It is so easy to look at these wonderful pictures and assume it is “picture perfect” ALL the time.
Please don’t ever feel bad! I can just about guarantee you that every photo you see on blogs and any other social media is always staged to look it’s best, but isn’t how it is in real lives. We all have to actually live in our homes – right?
Beautiful!! I wanted to ask what the length of your vanity, mirror and lights are. We are redoing our bathroom and I love the proportions you used.
Thank you! Our vanities are 60″ wide, the mirrors are 34″ in diameter and the lights above the vanities are 24″ wide.