Budget Master Bedroom Makeover Reveal
I’m happy to report that my budget master bedroom makeover is finally complete! This project was many months in the making, but we finally have a retreat that we can truly enjoy.

The first thing we did in this room was to paint it a lighter color. I was convinced that I would love the darker color that it originally was, but it made it feel too much like a cave, especially at night.
You may not be able to tell, but the room went from a milk chocolate brown to a much lighter custom mixed color from Sherwin Williams. I know that some of you will ask about the color, but I really can’t tell you what it is. It was in between two shades on a color swatch and then I had them tweak it some more.
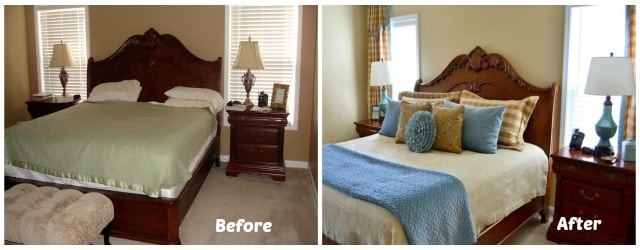
The next item to get checked off of my to-do list was to make new draperies. I love buffalo check fabric and lucked up on some at a local fabric outlet for $3/yard! I went nuts and bought 30 yards – anybody need some brown/cream buffalo check fabric? I just happen to have plenty to spare. 😉
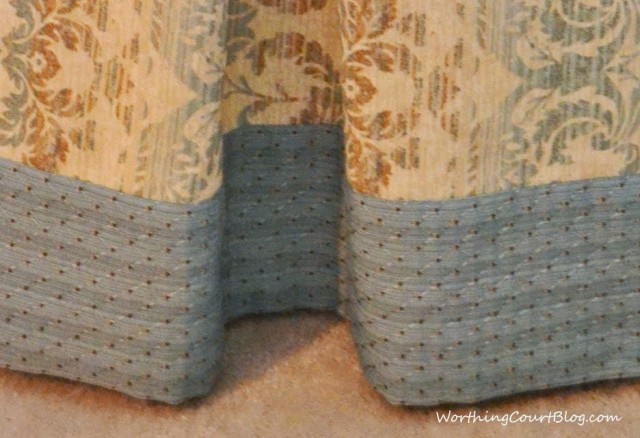
Anyway, I made these skirted, rod pocket drapery panels and added blue banding to them.

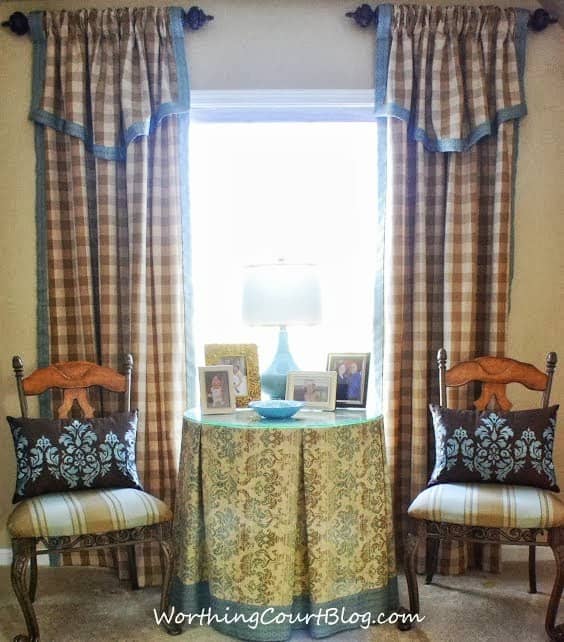
I had to make two pairs of draperies – the ones above that frame the bed and another pair to frame the window in the seating area. The draperies were a big job that I was glad to get checked off of my to-do list!
Next up was the bed. I found a not-so-terribly-priced coverlet at Target. Since this is a budget makeover, I gave a lot of thought to making my own bed cover of some kind. In the end though, I figured that by the time that I bought all of the fabric to make and line the bedspread and considered my time, I would have spent nearly as much for a diy version.
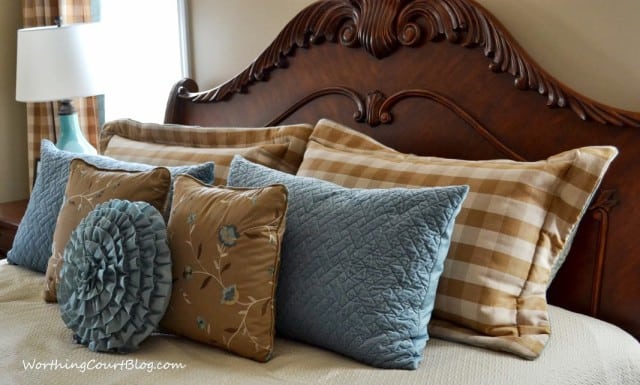
Now pillows – gotta have pillows! I made the pillow shams and throw pillows myself. I rarely buy a pillow, but I found the cute ruffled one for a good price and knew it was something I wouldn’t want to fool with making so it jumped into my hot little hands. If you’re interested, you can click HERE for a full tutorial on how to make a pillow sham.
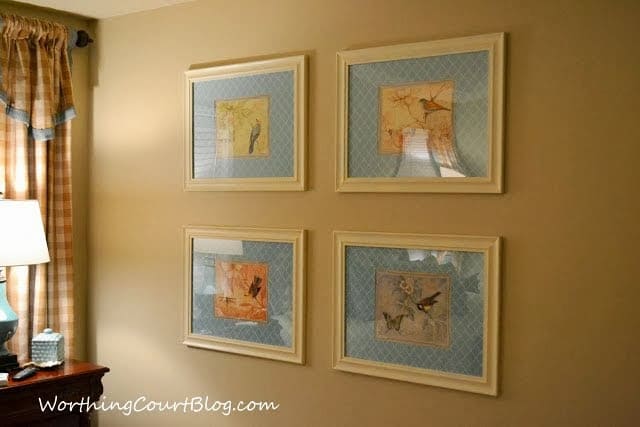
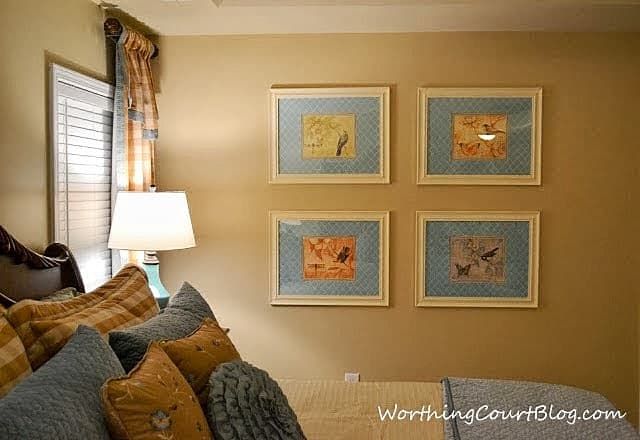
There is a large wall on one side of the bed that I wanted to fill with some kind of artwork, but it needed to be on the cheap since this is a budget makeover. I was able to make my own after purchasing some very inexpensive frames, a calendar, some wrapping paper and poster board.
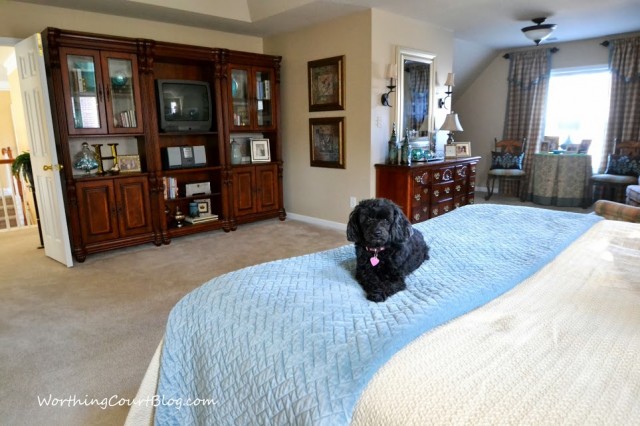
Our bedroom is located over the garage so it’s a rather large space. Generously sized rooms typically are a good thing, but having a bedroom this large is really a bit of a waste for us. This photo using the wide angle lens distorts it a bit, but it should give you a good feel for the size and shape of the room. {And yes, we have the dreaded ceiling fan – a must in the South and for women of a certain age.}
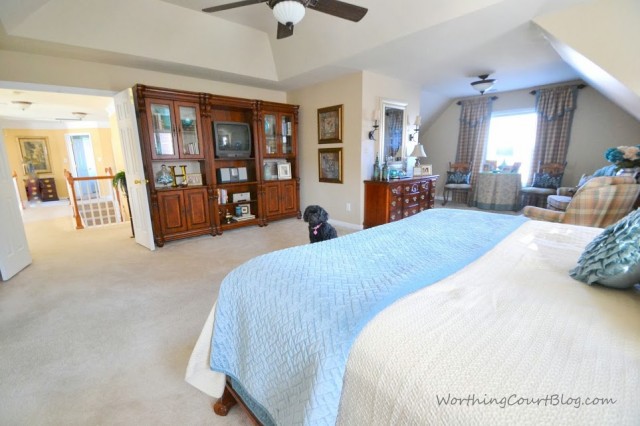
In spite of the large size of the room, there really wasn’t a great place to put our dresser, mirror and chest of drawers. You would think that the logical place for the dresser was across from the foot of the bed, but it just looked lost on that big wall. So both pieces of furniture wound up in the sitting area, which was the hardest part of the room for me to deal with.
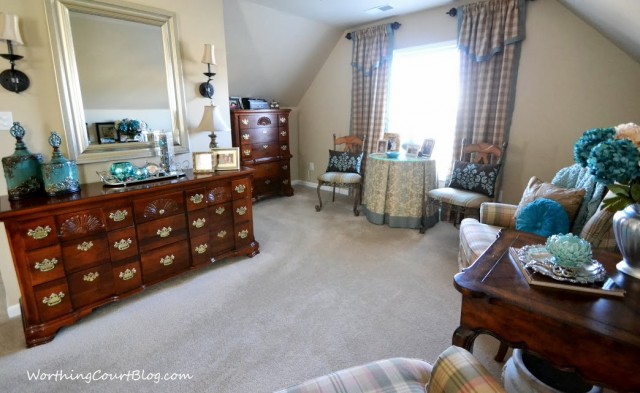
This is the part of the room that is the biggest waste of space for us. We aren’t sitting room people – we don’t sit in our bedroom to read or watch tv – all we really need is a place to put on our socks and shoes. But the space is there so I had to do something with it. Fortunately, we already had all of the furniture that we needed to fill the space.
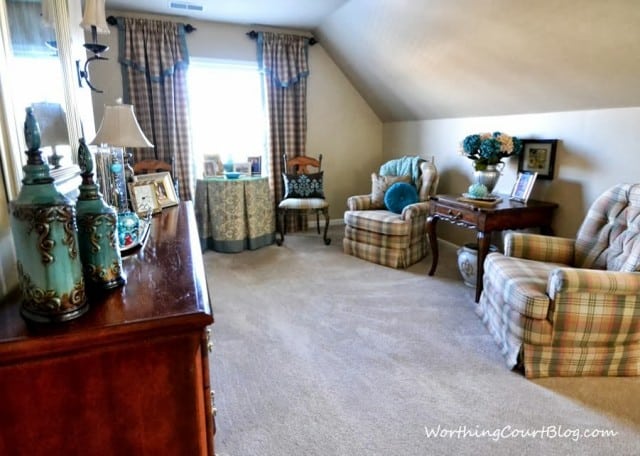
The vivid blue of these hydrangeas really adds a nice pop of color to this little spot.
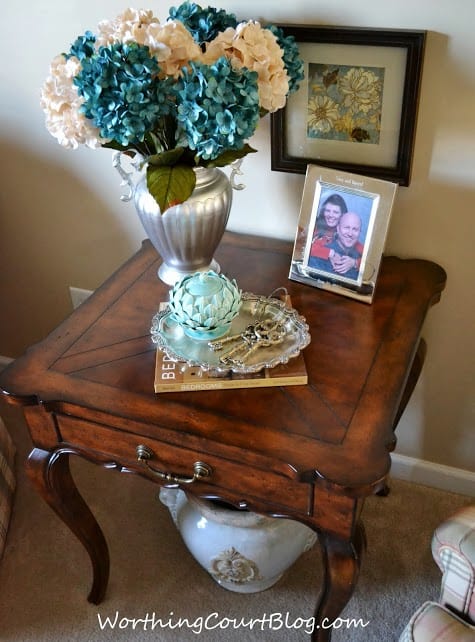
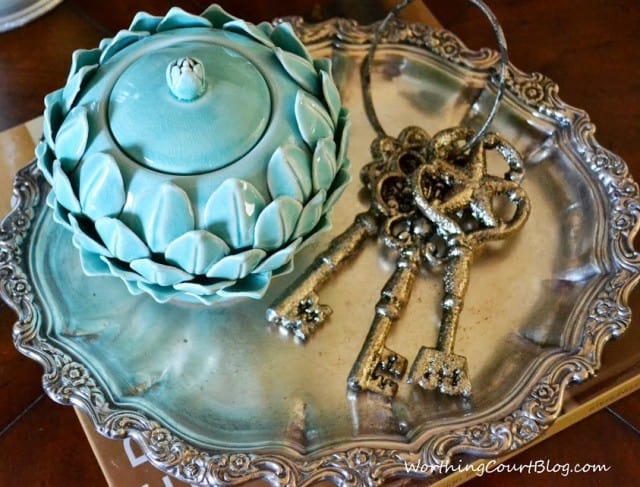
I love being able to use family heirlooms around the house. This silver tray was a 25th wedding anniversary gift to my parents many years ago.
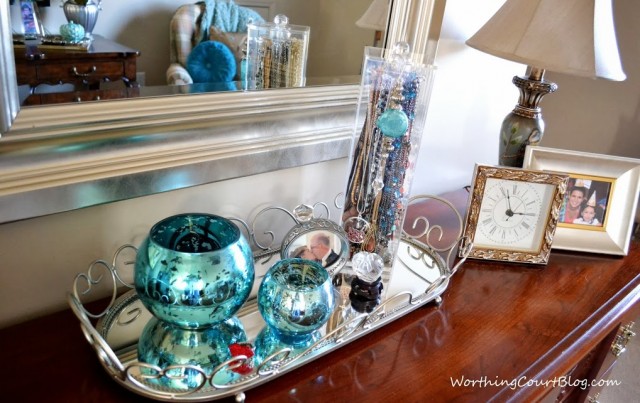
Over on my dresser, a mirrored tray is great for holding my jewelry. The blue mercury glass bowls are really meant to be candle votives, but I use them to hold my watches and rings.
Two chairs with recovered seats and a decorator table help to fill the space under the window. The box pleated tableskirt that I made adds one more fabric element to the room.
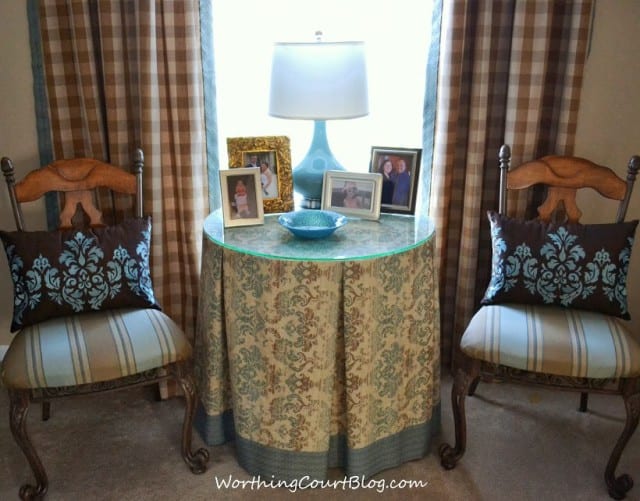
The banding detail that I added around the bottom is the same fabric as the banding on the draperies and helps to tie things together just a little more.
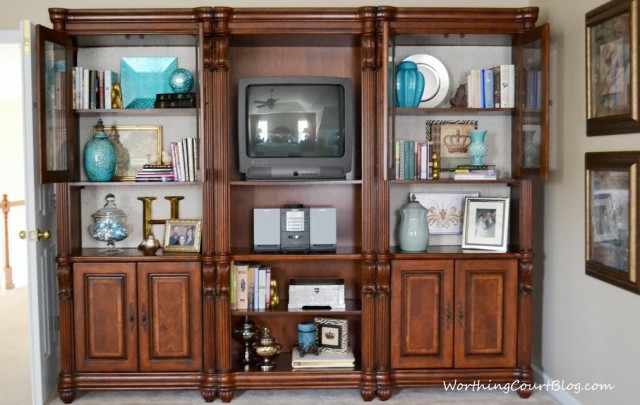
A triple bookcase sitting across from the foot of the bed received a makeover too. That’s my sweet Diva Dog shadow at the foot of the bed.
The bookcases were blah and boring and in need of some minor repairs.
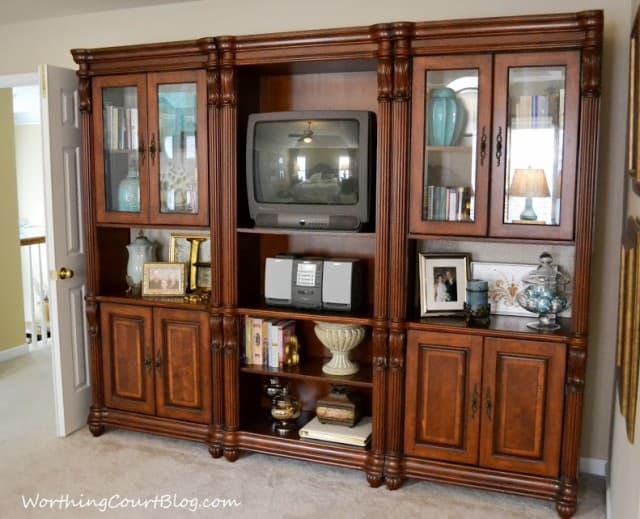
The glass on the front creates quite a glare, so I’ve opened them so you can get a better look at the interior.
Hi Suzy! Your bedroom is so gorgeous! Love that blue.
The room is magazine worthy.
Hope to see you on my blog:)
Sanghamitra.
ACK! I had a long comment and my browswer crashed. I hate when that happens. Just wanted to tell you how beautiful you room turned out. Your bed is wonderful, and I even like those rockers you want to recover. Sometimes it’s nice to have something a little unexpected, and I think the plaid and other colors is that part.
I’ll be showing this post to my mom. She is redoing her Master bedroom too. Her walls are blue and the furniture is dark, so she’s been looking for ideas to bring in more color. I’m sure she’ll find inspiration from your lovely room.
Thank you so much for linking to my party, and I hope you will come again next week!
You room is stunning. I love all of your fabrics and your accessories are so beautiuful. Your vignettes are lovely. Your pictures are fabulous also. Thanks so much for joining TTT. Hugs, marty
Oh WOW, it’s totally gorgeous!!!! Such a beautiful room and I adore your sitting room–Ohh la la!!!
XO
Cindy
Very nice, love you color choices..A very pretty place to spend time..
Lovely
Lovely and fresh! The blues are fabulous. Visiting from Tutes and Tips. 🙂
What lovely changes you made. I love the blues. I am really into blues now and so I am really digging what you have done with your bedroom.
Visiting from TTT. Thanks for sharing.
Sincerely,
Eldarose from http://RE-inventedstyle.blogspot.com
Wow! Great job! What a difference! You had the vision and created it! ~Zuni
so pretty
Hi Suzy!
Your bedroom is lovely. You are a very talented decorator!
Since this is my first time visiting I checked out the links you shared on the lead up to the finished bedroom. I also tried to follow you, but you know how persnickety blogger can be…
xoxo Bunny Jean
Wednesday’s Bunny Hop Party!
What a lovely relaxing space. I know you must be thrilled to have it finished.
Happy to be a new follower from Wow us Wednesdays.
Laura
http://imsovintage.blogspot.com/
Great transformation, Suzy. Love the color palette and what a nice big room. I would love a sitting area like that. Thanks for sharing at Wow.
Hi again Suzy. Just wanted to tell you I featured your beautiful bedroom on my party featured today. Thanks so much for sharing, and I’d love to have you back next week. If you’d like, there is a feature button on my blog if you’d like it for your sidebar or feature page.
just lovely!
Thanks for linking up and don’t forget about registering for my current giveaway….
Ramsign Giveaway: Porcelain Enamel Sign {up to $99 value}
XO, Aimee
Your room is beautiful! Thank you for sharing your lovely post at Potpourri Friday!
Wow! What a transformation! This would be a perfect project to link up at our “impossibles” party today! Stop by and link up!
blessings,
karianne
Wow – this is fabulous!
This would be a perfect inspirational post for our “Impossibilities” challenge …
I’ve joined up with 5 talented bloggers for an “Imagine the Impossibilities” challenge multi-blog link party going on now. It’s all about tackling your most daunting task … and you can find out more at this link …
http://www.eclecticallyvintage.com/4/post/2012/01/imagine-the-impossibilities-link-party.html
Hope to see you there!
Kelly
You did a BEAUTIFUL job creating a restful master suite! The colors and accessories are so nice and the sitting area…SIGH…